
How to Setup a Perforce Workflow, Automate & Distribute Custom UE4 Builds
Image Source: Twitter/nightmask3
Estimated Read Time: ~16 minutes
Table of Contents
- Introduction: Project State & Goals
- First Steps: Fix errors, upgrade stock UE4, figure out folder hierarchy
- Configuring Perforce: p4ignore & type mappings
- UE4 Installed Build: Building the Engine for Distribution & Build Automation
- Engine Distribution & Project Association
- Customizing UE4 & Engine Upgrades from Epic
- References
1- Introduction: Project State & Goals
I have recently joined a group of friends to develop a 3D parkour game in Unreal Engine 4.
The development team was small, it consisted of:
- 1x technical artist / programmer
- 1x sound engineer / producer / designer
- 1x 3D artist
You can check out the team’s Twitter Page here.
The team was using the stock UE4 engine with a couple plugins for art tools such as Houdini, Substance and some utility plugins like AutoSettings.
We wanted to be able to build UE4 from source and make changes to the engine as necessary. Even though I have been working with UE4 source for a while and was familiar with the development workflow, I haven’t really dealt with build and distribution aspects of it. Thankfully, almost all of the game studios I worked with had a dedicated build engineer to handle all this which allowed me to focus on the performance aspect of the titles. Well, up until this time: Now I had to figure out how to setup a UE4 development and distribution workflow and the small team size was making it an achievable goal.
No one in the team dealt with this kind of problem before, and we couldn’t find anyone around our friend circles to ask.
Turns out not many build engineers are around, who knew?
There were many unknowns for us to figure out:
- Building UE4 from source is pretty straightforward and well documented, but how to package it for distribution?
- Which files to push to the source control and which files to ignore?
- We’re talking of processing a few gigs to tens of gigs of binaries, asset files, source/header files, etc.
- How do we go about the plugins with the custom engine?
- What would be the process of upgrading an engine version once we start customizing?
- How to configure the game project so it uses the custom UE4 engine and how to do it seamlessly for the team?
- Just double clicking a couple files should suffice, no one should be doing any ‘advanced user’ configuration
With all these in mind, I started to think of the next steps considering the current state of things:
The State
- Small team, no dedicated programmer
- Stock UE4.21 - 3-4 major versions behind latest release
- p4 for source control, depot contains only the game project contents
- Packaging the game fails with build-time errors
The Goals
- Engine upgrade to latest UE4
- UE4 build from source, ability to customize as needed
- Engine distribution to team members
- Figure out an efficient p4 workflow for game projects & team members to use the custom UE4 build with
- Seamless integration
- Build automation
2- First Steps: Fix errors, upgrade stock UE4, figure out folder hierarchy
The obvioust first step was to fix the packaging errors and carry out an engine upgrade to improve the stability of the project all together and provide a more stable and improved engine version to base the custom engine on. So we did that, fixed the packaging errors and upgraded to UE4.24 - the latest release at that point in time.
Next came some questions:
- Where do we put the engine source directory? - In the game folder? Next to the game folder?
- Where do we put the packaged engine binaries?
At this point, I’ve been looking for some kind of guide on how to setup a p4/UE4 development workflow and I came across some great resources along the way. See References section for the full list.
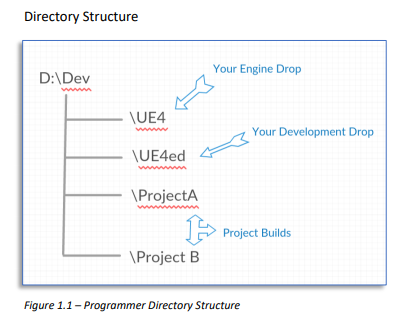
I want to point out the [5] Wise Engineering - Managing Multiple UE4 Projects resource which was particularly helpful for deciding how to move forward with restructuring the folder hierarchy. The author lays down a folder structure for a customized UE4, supporting multiple game projects while adhering to the needs of the different disciplines (programmers vs artists):
Content developers download the precompiled build for their platform and utilize that build for their workload.
Programmers typically recompile their own local builds of their project.
Build labels are often used to give a finer control over what build a team member uses.
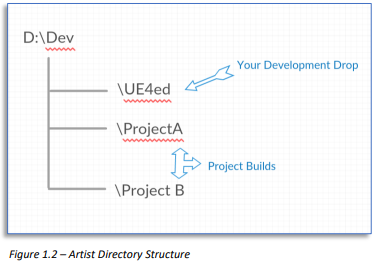
The artists would just get the engine binaries while programmers could utilize both by using the engine built from source for development and the pre-built binaries for testing.
We ended up using the proposed idea and with the following hierarchy in the repository
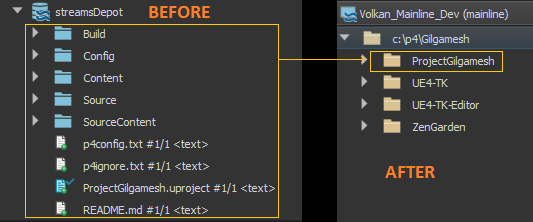
ZenGarden and ProjectGilgamesh are the game projects
Looking back at this, you could probably also add a Documentation folder here and maybe prepend the game project folders with an underscore to highlight and sort the game project folders. Anyways.
Having the folder hierarchy figured out, next step was to figure out how to configure the perforce server and workspaces.
3- Configuring Perforce: p4ignore & type mappings
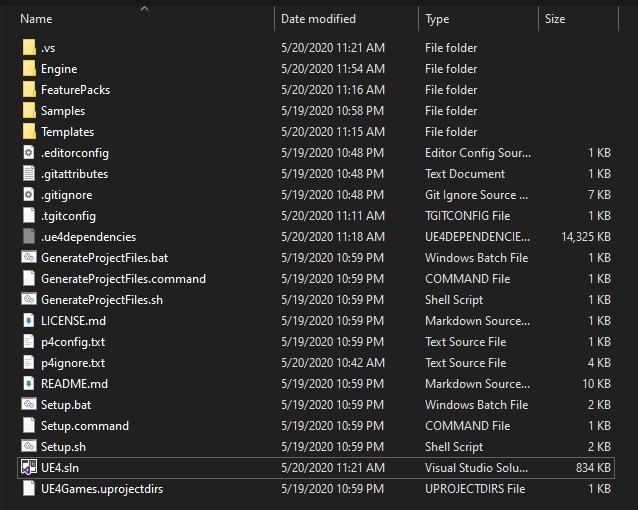
The usual workflow for building UE4 from source goes like this:
- Clone the UE4 repo on GitHub(Membership to the Epic Games org needed to see the page) and switch to the specific point release branch you want to build
- Run Setup.bat
- Run GenerateProjectFiles.bat
- Launch UE4.sln
Setup.bat downloads a whole bunch of binaries, media files, patches, header files, etc. If you are running on a budget server, you’ll want to be conservative on what to push to the server in order to avoid filling the available space. The UE4 source folder should take 4.50GB for UE4.25 - this was the size when you synced UE4 from source around the time 4.25 was released. Running Setup.bat will add ~45GB of files to the directory, and if you commit these to p4, you’ll be in for long sync times and will run the risk of running out of space on the p4 server which can also be an unpleasant experience based on your p4 server provider/server.
To avoid all that hassle, I have run ‘Reconcile offline work’ after running Setup.bat on p4v to see which directories get populated by the setup script and added them to the p4ignore.txt as follows.
#
# Setup.bat Ignores
#
# There already might be some files pushed into the repo that would otherwise be
# filtered: those are from the initial commit, coming directly from UE4-GitHub.
# After running Setup.bat, the folders below will be populated with ~46GB of
# files. Hence we'll be blanket-ignoring some directories such as ThirdParty,
# Media, Content, etc. If we want to change anything in those blanket-ignored
# folders, we should unignore the specific thing we're adding.
#
.git\*
Samples\**\Content\*
Samples\**\Media\*
Templates\**\Content\*
Templates\**\Media\*
Templates\Media\*
Engine\Platforms\**\Content\*
Engine\Documentation\*
Engine\Extras\*
Engine\Content\*
Engine\Build\*
Engine\Source\ThirdParty\*
Engine\Source\Programs\*
Engine\Source\Developer\*
Engine\Plugins\*

# Specific files
Engine\Config\ShaderCategories.csv
.tgitconfig
.ue4dependencies

# After all this above, there's still a couple folders and files left that doesn't
# fit the filtering criteria above, so we handle them individually here.
Engine\Source\Runtime\Navmesh\RecastDemo*
Engine\Source\Runtime\Launch\Resources\Mac*
Engine\Source\Runtime\Launch\Resources\Linux*
Engine\Source\Runtime\Experimental\Voronoi\Private\voro++*

Engine\Source\Runtime\Apple\MetalRHI\Public\ue4_stdlib.metal
Engine\Source\Runtime\AVEncoder\Private\Microsoft\Windows\ThirdParty\NvEncoder\LicenseAgreement.pdf
Engine\Source\Runtime\Experimental\Chaos\.clang-format
Engine\Source\Runtime\TraceLog\Private\Trace\LZ4\Epic.patch
Templates\TemplateResources\Standard\*.FBX
Adding this ignore block on top of the regular UE4 p4 ignore list, running Reconcile Offline Work after Setup.bat should no longer detect any files.
This helps keeping the repo size in check: ~5GB instead of ~50GB.
So far so good for a stock UE4 setup. If you want to distribute the customized UE4 to your team, you’ll probably want some plugins built & pre-installed. For that, you’ll need to add the plugin source files that can be acquired from the Epic Store, released for the version your custom UE4 is based on. Make sure to check the license for redistribution.
The plugins usually go in one of two places
- Engine\Plugins\Marketplace\
- Engine\Plugins\Runtime\
To properly add the necessary files to build plugins with the custom UE4 source, we add the following to the p4ignore:
#
# PLUGINS
#
# Plugins that come with Setup.bat are ignored above altogether, so we un-ignore
# the custom plugins we want to ship with the customized UE4.
!Engine\Plugins\Marketplace*
!Engine\Plugins\Runtime\HoudiniEngine*
# ... but keep ignoring their Build & Intermediate
Engine\Plugins\Marketplace\**\Intermediate\*
Engine\Plugins\Marketplace\**\Binaries\*
Engine\Plugins\Runtime\**\Intermediate\*
Engine\Plugins\Runtime\**\Binaries\*
Here is the final p4ignore.txt with all the intermediate / cache folders ignored in case you’re interested.
In addition to the ignore list, we also need to configure the file type mappings before we can start using the customized UE4 workflow.
Type mappings tell the p4 server which file permissions to use for certain file types and the UE4 Documentation page on Perforce Setup lays out the details on how to configure this for a UE4 workflow. We ended up using the type mappings mentioned on the website, but with a minor change:
- Add write permission
+wto the config files
We did this as the engine packaging process writes into some config files and the build process would fail without it.
Note: If you’ve done this and found out giving all the config files write permission might cause an issue further down the line, please let me know in the comments!
# Perforce File Type Mapping Specifications.
#
#  TypeMap:             a list of filetype mappings; one per line.
#                       Each line has two elements:
#
#                       Filetype: The filetype to use on 'p4 add'.
#
#                       Path:     File pattern which will use this filetype.
#
# See 'p4 help typemap' for more information.

TypeMap:
                binary+w //depot/....exe
                binary+w //depot/....dll
                binary+w //depot/....lib
                binary+w //depot/....app
                binary+w //depot/....dylib
                binary+w //depot/....stub
                binary+w //depot/....ipa
                binary //depot/....bmp
                text //depot/....ini
                text+w //depot/....config
                text //depot/....cpp
                text //depot/....h
                text //depot/....c
                text //depot/....cs
                text //depot/....m
                text //depot/....mm
                text //depot/....py
                binary+l //depot/....uasset
                binary+l //depot/....umap
                binary+l //depot/....upk
                binary+l //depot/....udk
                binary+l //depot/....ubulk
Building the UE4 from source will overwrite some files tracked by the p4 server such as executables, binary files, libraries, and in certain cases config & manifest files. With the type mappings above, we have given write access to these files so the team members cam overwrite them without the need to check them out first with p4v.
Now that the version control is configured, we’re good to start development on the UE4 source drop.
Next we need to figure out how to package the engine.
4- UE4 Installed Build: Building the Engine for Distribution & Build Automation
Unreal Documentation calls the process Using An Installed Build.
It boils down to the following:
- UE4 uses a scripting system called BuildGraph to generate build tasks and ultimately package the engine
- AutomationTool.exe drives the BuildGraph system, built through
UE4.sln - Build tasks are generated through a configuration file:
[UE4Root]/Engine/Build/InstalledEngineBuild.xml
If you start a command line terminal in [UE4Root]\Engine\Binaries\DotNET\ directory, you can package the engine running the following:
AutomationTool.exe BuildGraph -target="Make Installed Build Win64" -script=Engine/Build/InstalledEngineBuild.xml -clean Let’s take a quick look at the parameters:
-target="Make Installed Build [PLATFORM]"
-script=Engine/Build/InstalledEngineBuild.xml
-clean - We choose
[PLATFORM]=Win64as we’re working on Windows operating system for the-targetparameter. - We want a
-cleanbuild. - Use
InstalledEngineBuild.xmlfor build configuration
The InstalledEngineBuild.xml file contains a bunch of settings. First, we see some default value definitions for various platforms:
<!-- Get default values for each platform being enabled -->
<Property Name="DefaultWithWin64" Value="true"/>
<Property Name="DefaultWithWin64" Value="false" If="$(HostPlatformEditorOnly) Or ($(HostPlatformOnly) And '$(HostPlatform)' != 'Win64')"/>

<Property Name="DefaultWithMac" Value="true"/>
<Property Name="DefaultWithMac" Value="false" If="$(HostPlatformEditorOnly) Or ($(HostPlatformOnly) And '$(HostPlatform)' != 'Mac')"/>

<Property Name="DefaultWithLinux" Value="true"/>
<Property Name="DefaultWithLinux" Value="false" If="$(HostPlatformEditorOnly) Or ($(HostPlatformOnly) And '$(HostPlatform)' != 'Linux')"/>

<Property Name="DefaultWithLinuxAArch64" Value="true"/>
<Property Name="DefaultWithLinuxAArch64" Value="false" If="$(HostPlatformEditorOnly) Or ($(HostPlatformOnly) And '$(HostPlatform)' != 'Linux')"/>

<Property Name="DefaultWithPlatform" Value="true"/>
<Property Name="DefaultWithPlatform" Value="false" If="$(HostPlatformEditorOnly) Or $(HostPlatformOnly)"/>

<Property Name="DefaultWithIOS" Value="$(DefaultWithPlatform)"/>
<Property Name="DefaultWithIOS" Value="false" If="'$(HostPlatform)' != 'Mac' And !$(AllPlatforms)"/>

<Property Name="DefaultWithWin32" Value="$(DefaultWithPlatform)"/>
<Property Name="DefaultWithWin32" Value="false" If="'$(HostPlatform)' != 'Win64' And !$(AllPlatforms)"/>

<Property Name="DefaultWithHoloLens" Value="$(DefaultWithPlatform)"/>
<Property Name="DefaultWithHoloLens" Value="false" If="'$(HostPlatform)' != 'Win64' And !$(AllPlatforms)"/>
Then, these default values are used to determine what platform the engine can package a project with.
<!-- Setup default target platforms for Installed build if they haven't been specified on the commandline -->
<Option Name="WithWin64" Restrict="true|false" DefaultValue="$(DefaultWithWin64)" Description="Include the Win64 target platform"/>
<Option Name="WithWin32" Restrict="true|false" DefaultValue="$(DefaultWithWin32)" Description="Include the Win32 target platform"/>
<Option Name="WithMac" Restrict="true|false" DefaultValue="$(DefaultWithMac)" Description="Include the Mac target platform"/>
<Option Name="WithAndroid" Restrict="true|false" DefaultValue="$(DefaultWithPlatform)" Description="Include the Android target platform"/>
<Option Name="WithIOS" Restrict="true|false" DefaultValue="$(DefaultWithIOS)" Description="Include the iOS target platform"/>
<Option Name="WithTVOS" Restrict="true|false" DefaultValue="$(DefaultWithIOS)" Description="Include the tvOS target platform"/>
<Option Name="WithLinux" Restrict="true|false" DefaultValue="$(DefaultWithLinux)" Description="Include the Linux target platform"/>
<Option Name="WithLinuxAArch64" Restrict="true|false" DefaultValue="$(DefaultWithLinuxAArch64)" Description="Include the Linux AArch64 target platform"/>
<Option Name="WithPS4" Restrict="true|false" DefaultValue="false" Description="Include the PS4 target platform"/>
<Option Name="WithXboxOne" Restrict="true|false" DefaultValue="false" Description="Include the XboxOne target platform"/>
<Option Name="WithSwitch" Restrict="true|false" DefaultValue="false" Description="Include the Switch target platform"/>
<Option Name="WithLumin" Restrict="true|false" DefaultValue="$(DefaultWithPlatform)" Description="Include the Lumin target platform on Windows"/>
<Option Name="WithLuminMac" Restrict="true|false" DefaultValue="$(DefaultWithPlatform)" Description="Include the Lumin target platform on Mac"/>
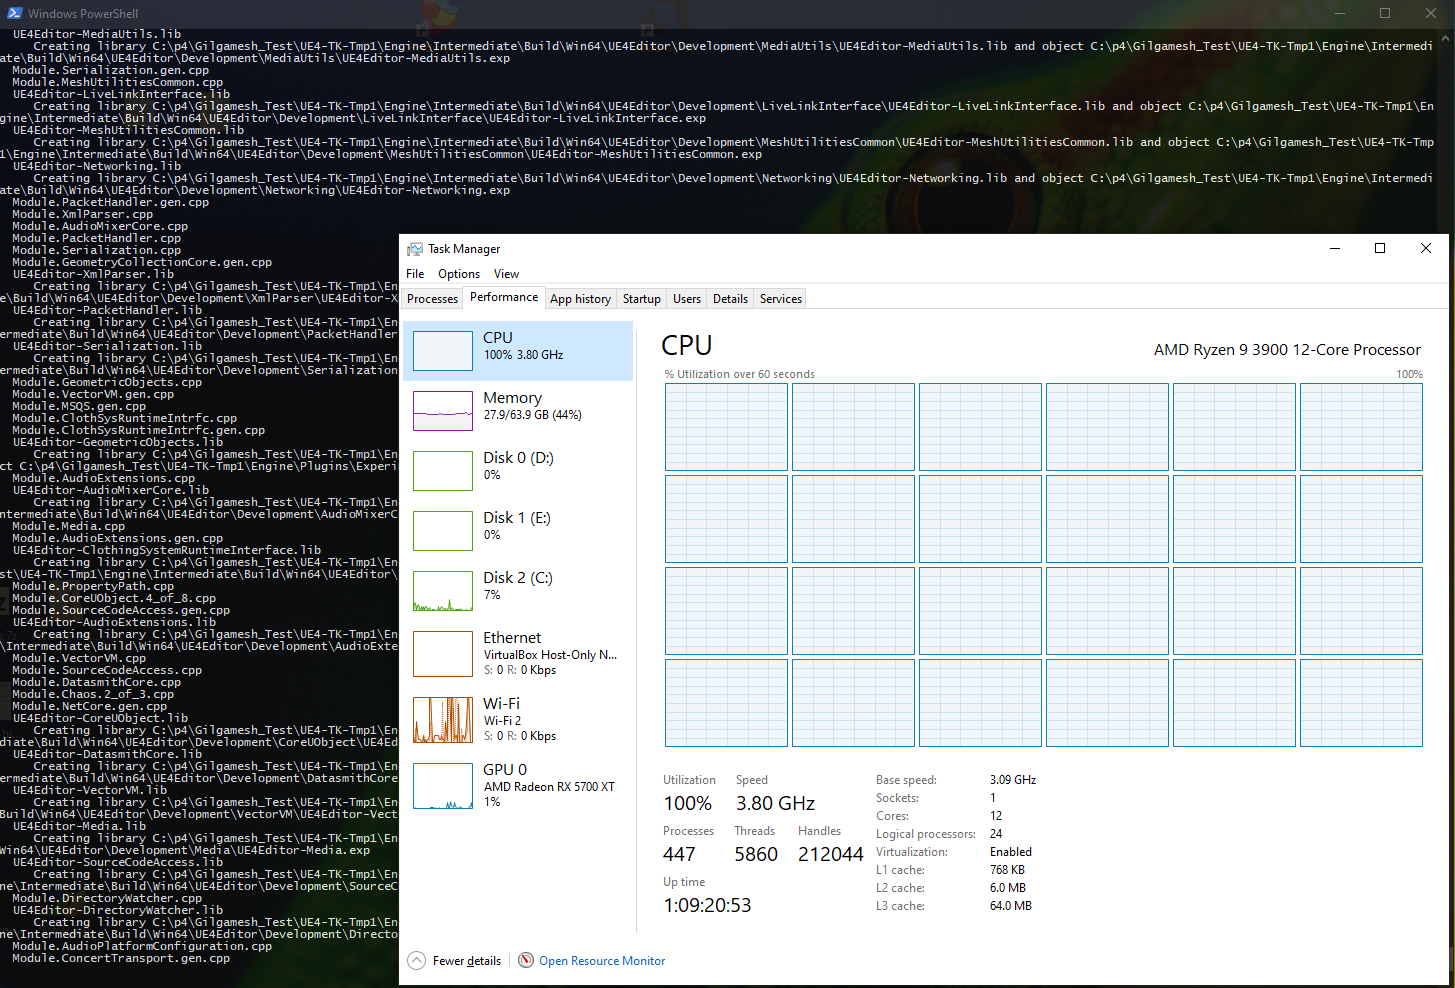
<Option Name="WithHoloLens" Restrict="true|false" DefaultValue="$(DefaultWithHoloLens)" Description="Include the HoloLens target platform"/>Packaging is already a very long process: It takes more than an hour on my 12 core Ryzen 9 CPU while utilizing 100% CPU most of the time. If you’re not planning to build your game project for certain platforms, you can set some of the default values to false to exclude those platforms if you don’t want to wait (a lot) longer.
In our case we didn’t care about Mac, Linux, IOS or Win32 or the XR platforms and wanted only Win64, so we set the following values for defaults:
<!-- Get default values for each platform being enabled -->
<Property Name="DefaultWithWin64" Value="true"/>
<Property Name="DefaultWithMac" Value="false"/>
<Property Name="DefaultWithLinux" Value="false"/>
<Property Name="DefaultWithLinuxAArch64" Value="false"/>
<Property Name="DefaultWithPlatform" Value="false"/>
The output directory for the packaged engine is determined a couple more options later
<!-- The local output directory -->
<Property Name="LocalInstalledDir" Value="$(RootDir)/LocalBuilds/Engine/Windows"/>
You can leave it as is or change it to your liking.
If you note the p4ignore earlier, we’ve listed the LocalBuilds/ directory as we’ve decided to leave the output directory as is.
To automate the entire packaging process, I’ve written a batch script with the following steps:
- Check whether
UE4.slnfile is exists, generate it if it doesn’t exist - Check if
AutomationTool.exeexists, if it doesn’t- Find
MSBuild.exeusingvswhere.exe - Build
AutomationTool.exewithMSBuild.exe
- Find
- Clean up engine output directory if it already exists
- Run
AutomationTool.exeto package the engine
PackageEngine.bat
@echo off

setlocal enabledelayedexpansion

set VSWHERE="%PROGRAMFILES(x86)%\Microsoft Visual Studio\Installer\vswhere.exe"
set MSBUILD_QUERY1=!VSWHERE! -latest -requires Microsoft.Component.MSBuild -find MSBuild\**\Bin\MSBuild.exe
set MSBUILD_QUERY2=vswhere.exe -version "[15.0,16.0)" -products Microsoft.VisualStudio.Product.BuildTools -find MSBuild\**\Bin\MSBuild.exe
set MSBUILD_QUERY3=vswhere.exe -version "[15.0,16.0)" -find MSBuild\**\Bin\MSBuild.exe

set BUILD_FLAG_CLEAN=0
set MSBUILD_QUERY=!MSBUILD_QUERY1!
set MSBUILD=
set SOLUTION_FILE=UE4.sln
set SOLUTION_FILE_PATH=%~dp0!SOLUTION_FILE!

set ENGINE_PACKAGE_OUTPUT_DIRECTORY=%~dp0LocalBuilds
set ENGINE_BUILD_COMMAND=AutomationTool.exe BuildGraph -target="Make Installed Build Win64" -script="Engine/Build/InstalledEngineBuild.xml"

::-------------------------------------------------------------------------------------------------------------------------------------------------------------

:: parameter scan
for %%i IN (%*) DO (
    if "%%i"=="Clean"   set BUILD_FLAG_CLEAN=1
    if "%%i"=="-c"      set BUILD_FLAG_CLEAN=1
    if "%%i"=="-clean"  set BUILD_FLAG_CLEAN=1
    if "%%i"=="-Clean"  set BUILD_FLAG_CLEAN=1
    if "%%i"=="-C"      set BUILD_FLAG_CLEAN=1
)


::
:: MAIN()
::
echo.
echo [TK-Build] Packaging Engine...
pushd %~dp0
cd Engine\Binaries\DotNET\


:: Check if GenerateProjectFiles.bat has been run
if not exist %~dp0UE4.sln (
    echo [TK-Build] Couldn't find UE4.sln.
    echo [TK-Build] Running GenerateProjectFiles.bat...
    call %~dp0GenerateProjectFiles.bat
    if !errorlevel! neq 0 (
        echo [TK-Build] Error: Couldn't generate project files.
        exit /b -1
    )
)


:: Check if Engine Packaging dependencies exist
if not exist AutomationTool.exe (
    echo [TK-Build] AutomationTool.exe not found, building AutomationTool...
    call :FindMSBuild
    if !errorlevel! equ -1 (
        exit /b -1
    )
    call :BuildAutomationTool
    if !errorlevel! neq 0 (
        echo [TK-Build] Error building AutomationTool, exiting...
        exit /b -1
    )
)

:: Check engine packaging output directory and clean it if there's a previous engine package
if exist !ENGINE_PACKAGE_OUTPUT_DIRECTORY! (
    echo [TK-Build] Cleaning... ENGINE_PACKAGE_OUTPUT_DIRECTORY = !ENGINE_PACKAGE_OUTPUT_DIRECTORY!
    rmdir /S /Q !ENGINE_PACKAGE_OUTPUT_DIRECTORY!
)


:: Package the engine
if !BUILD_FLAG_CLEAN! equ 1 (
    set ENGINE_BUILD_COMMAND=!ENGINE_BUILD_COMMAND! -clean
)
echo [TK-Build] ENGINE_BUILD_COMMAND = !ENGINE_BUILD_COMMAND!
echo.
call !ENGINE_BUILD_COMMAND!

popd

exit /b 0

::-------------------------------------------------------------------------------------------------------------------------------------------------------------

::
:: BuildAutomationTool()
::
:BuildAutomationTool
"!MSBUILD!" !SOLUTION_FILE_PATH! -target:Programs\AutomationTool:Clean /p:Configuration="Development Editor" /p:Platform=Win64  /p:BuildProjectReferences=false
"!MSBUILD!" !SOLUTION_FILE_PATH! -target:Programs\AutomationTool:Rebuild /p:Configuration="Development Editor" /p:Platform=Win64
::echo ErrorLevel=!errorlevel!
exit /b !errorlevel!


::
:: FindMSBuild()
::
:FindMSBuild

for /f "usebackq tokens=*" %%i IN (`%MSBUILD_QUERY%`) DO (
    set MSBUILD=%%i
    goto CHECK_MSBUILD
)
:CHECK_MSBUILD
if not exist !MSBUILD! (
    echo [TK-Build] Build Error: MSBuild.exe could not be located.
    echo.
    exit /b -1
)

:: check arg1 == true (bPrintMSBuild)
if "%~1"=="true" (
    echo [TK-Build] MSBuild Found: !MSBUILD!
)
exit /b 0
At this point, one can follow the 3 simple steps to package the engine after syncing the repo the first time:
- Run
Setup.bat - Run
GenerateSolutions.bat - Run
PackageEngine.bat
Get some tea/coffee, take a walk, practice your favorite musical instrument as this’ll take a while…
And finally…
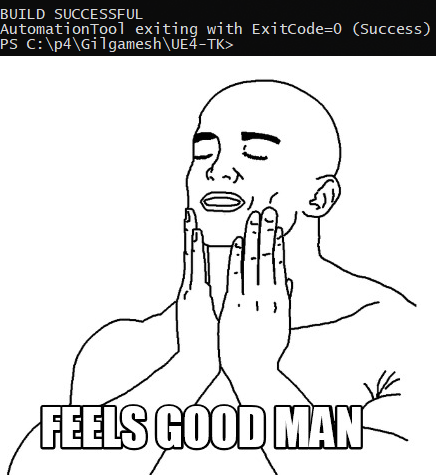
As you always test your new engine build because everything is assumed broken until tested (right?), you might find out that even the build was successful, runtime errors can still bother you. In our case, Substance was causing trouble with the custom UE4 build.
Using plugins with custom UE4 brings its own problems to the process. Substance was failing loading with a ‘DLL not found’ message when the game project was launched with the custom UE4.
To fix the packaging issue, we’ve extended PackageEngine.bat to copy over the missing DLLs right before exiting:
:: SUBSTANCE PLUGIN FIX
::
:: Without the next step, Substance won't load as their build process won't
:: copy the Engine\Plugins\Marketplace\Substance\DLLs folder into the packaged
:: engine directory.
::
:: there are 2 options here:
:: - Fix their *.Build.cs files (ideal)
:: - Copy missing DLLs using this script (quick)

:: This has to match the output directory defined in InstalledEngineBuild.xml
:: The currently defined path is ./LocalBuilds/Engine/Windows
set PACKAGED_ENGINE_OUTPUT_DIR=LocalBuilds\Engine\Windows\

set SUBSTANCE_MISSING_FOLDER_PATH_SOURCE=Engine\Plugins\Marketplace\Substance\DLLs
set SUBSTANCE_MISSING_FOLDER_PATH_DESTINATION=!PACKAGED_ENGINE_OUTPUT_DIR!Engine\Plugins\Marketplace\Substance\DLLs

if not exist !SUBSTANCE_MISSING_FOLDER_PATH_DESTINATION! (
    robocopy !SUBSTANCE_MISSING_FOLDER_PATH_SOURCE! !SUBSTANCE_MISSING_FOLDER_PATH_DESTINATION! /E
)
^ This goes right between popd and exit /b 0 of the PackageEngine.bat source earlier.
5- Engine Distribution & Project Association
Now that we have our installed build ready, we can distribute it to the team.
Again, to automate the process, a batch script is written in the engine source directory (UE4-TK) to copy the packaged engine binaries into its final destination, to UE4-TK-Editor:
PublishEngine.bat
set ENGINE_DESTINATION=UE4-TK-Editor

cd ../

IF EXIST %ENGINE_DESTINATION% (
	rmdir %ENGINE_DESTINATION% /s /q
)

robocopy UE4-TK/LocalBuilds/Engine/Windows %ENGINE_DESTINATION% /e
xcopy UE4-TK\RegisterEngine.bat %ENGINE_DESTINATION% /Y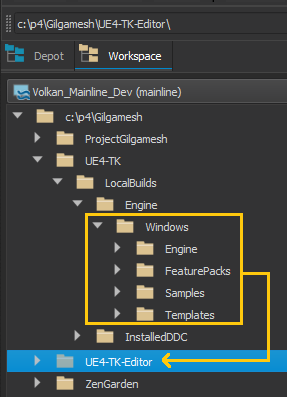
After running this script, ‘Reconcile Offline Work’ on the editor directory should be able to detect the changes made to the engine binaries on consecutive publishes. Remember to delete the final editor folder before reunning the PublishEngine.bat to avoid leftover files from the previous build, in case there are any.
I can possibly extend the PublishEngine.bat to further automate some more work in the future:
- Do some testing
- Test whether the custom build launches successfully without a crash/error
- Test whether the project launches successfully
- Push to perforce server
You’ll notice in the script above, we also copy a RegisterEngine.bat script, which doesn’t come with the stock UE4 and wasn’t mentioned before. Before I explain what it is, I want to talk about Engine Association.
If you open a .urpoject file with a text editor, you’ll see which engine version the project is using. Since there could be multiple UE4s installed on a system, there are multiple ways you can specify which UE4 build to use.
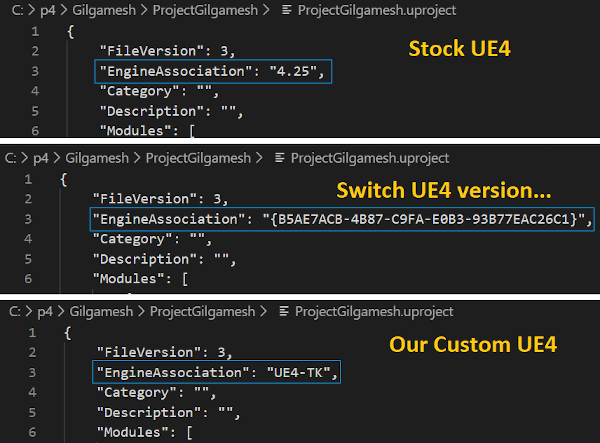
- Stock UE4 simply uses a version string
- Source builds use a hash created by
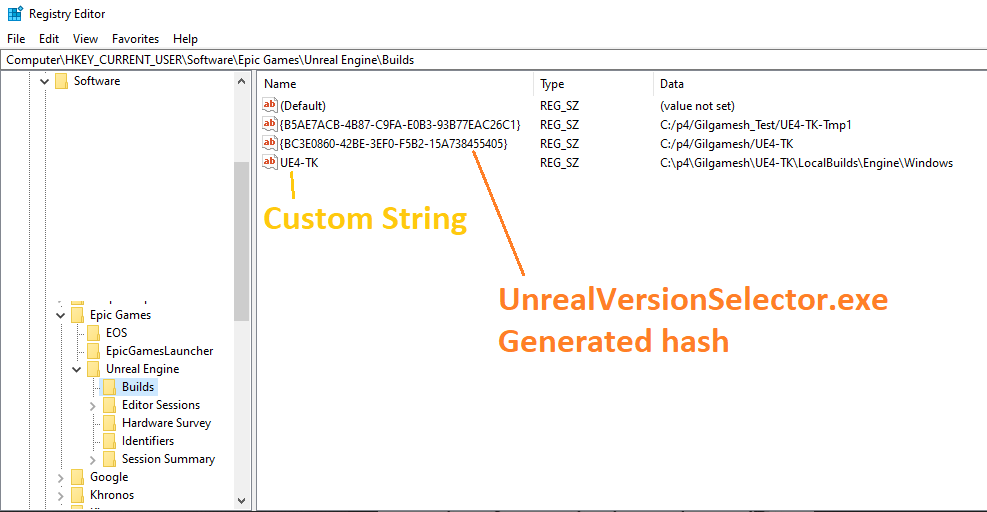
UnrealVersionSelector.exe- This hash is saved in the registry under
Computer\HKEY_CURRENT_USER\Software\Epic Games\Unreal Engine\Builds - This happens when you right click a
.uprojectfile and select Switch Unreal Engine Version…
- This hash is saved in the registry under
- You can use a custom string
The last two options utilize the Windows registry to work:
To automate creating this registry entry, a simple batch script is utilized:
RegisterEngine.bat
@echo off

setlocal

echo Registering custom engine...

set UE4TK=%cd%

:: https://docs.microsoft.com/en-us/windows-server/administration/windows-commands/reg-add
:: add the current directory to registry so the .uproject can find it
reg add "HKEY_CURRENT_USER\Software\Epic Games\Unreal Engine\Builds" /v "UE4-TK" /t REG_SZ /d "%UE4TK%"
This script is then distributed with the engine source drop and engine binaries so it’s super easy to update the registry entry for the desired custom UE4 installation directory.
After the .uproject is updated with the custom engine string, double clicking the .uproject file will launch the custom UE4 which concludes the work on publishing the engine.
6- Customizing UE4 & Engine Upgrades from Epic
UE4 source could be considered a large codebase with lots of contributors from different domains:
- Epic Games Devs
- Open Source contributors
- Plugin authors
- Your own contributions for customizing
Working with several UE4 projects scaling from small to AAA in the past couple years, I’ve seen a common pattern with customizing UE4: Mark every modification to the original source with comments
UE4 code...
// *_CHANGES_BEGIN - Modification context
customization code
// *_CHANGES_END
UE4 code...
Example: Modifying UE4’s PostProcess stack to add a sharpening pass developed by AMD called Contrast Adaptive Sharpening (CAS)
...
#include "PostProcess/PostProcessFFTBloom.h"
#include "PostProcess/PostProcessStreamingAccuracyLegend.h"
#include "PostProcess/PostProcessSubsurface.h"
/// AMD_CHANGES_BEGIN - FidelityFX / CAS
#include "PostProcess/PostProcessCAS.h"
/// AMD_CHANGES_END
#include "CompositionLighting/PostProcessPassThrough.h"
#include "CompositionLighting/PostProcessLpvIndirect.h"
#include "ShaderPrint.h"
.
.
.
enum class EPass : uint32
{
    MotionBlur,
    Tonemap,
    FXAA,
    PostProcessMaterialAfterTonemapping,
    // AMD_CHANGES_BEGIN - FidelityFX / CAS
    FFX_CAS,
    // AMD_CHANGES_END
    VisualizeDepthOfField,
    .
    .
    .
    PrimaryUpscale,
    SecondaryUpscale,
    MAX
};

const TCHAR* PassNames[] =
{
    TEXT("MotionBlur"),
    TEXT("Tonemap"),
    TEXT("FXAA"),
    TEXT("PostProcessMaterial (AfterTonemapping)"),
    // AMD_CHANGES_BEGIN - FidelityFX / CAS
    TEXT("FFX-CAS"),
    // AMD_CHANGES_END
    TEXT("VisualizeDepthOfField"),
    .
    .
    .
    TEXT("PrimaryUpscale"),
    TEXT("SecondaryUpscale")
};

.
.
.

// Post Process Material Chain - After Tonemapping
if (PassSequence.IsEnabled(EPass::PostProcessMaterialAfterTonemapping))
{
    FPostProcessMaterialInputs PassInputs = GetPostProcessMaterialInputs(SceneColor);
    PassSequence.AcceptOverrideIfLastPass(EPass::PostProcessMaterialAfterTonemapping, PassInputs.OverrideOutput);
    PassInputs.SetInput(EPostProcessMaterialInput::PreTonemapHDRColor, SceneColorBeforeTonemap);
    PassInputs.SetInput(EPostProcessMaterialInput::PostTonemapHDRColor, SceneColorAfterTonemap);

    SceneColor = AddPostProcessMaterialChain(GraphBuilder, View, PassInputs, PostProcessMaterialAfterTonemappingChain);
}

/// AMD_CHANGES_BEGIN - FidelityFX / CAS
if (PassSequence.IsEnabled(EPass::FFX_CAS))
{
    FCASInputs PassInputs;
    PassSequence.AcceptOverrideIfLastPass(EPass::FFX_CAS, PassInputs.OverrideOutput);
    PassInputs.SceneColor = SceneColor;
    SceneColor = AddFidelityFXCASPass(GraphBuilder, View, PassInputs);
}
/// AMD_CHANGES_END

if (PassSequence.IsEnabled(EPass::VisualizeDepthOfField))
{
    FVisualizeDOFInputs PassInputs;
    PassSequence.AcceptOverrideIfLastPass(EPass::VisualizeDepthOfField, PassInputs.OverrideOutput);
    PassInputs.SceneColor = SceneColor;
    PassInputs.SceneDepth = SceneDepth;

    SceneColor = AddVisualizeDOFPass(GraphBuilder, View, PassInputs);
}

.
.
.
Notice a few things:
- Each change is encapsulated between
*_CHANGES_BEGINand*_CHANGES_END, clearly marking where the changes have been made - Each
*_CHANGES_BEGINmarker also has an explanation on what it is
These will be specifically useful for:
- Providing a way to separate changes coming from engine upgrade vs changes made for customization.
This could be particularly handy when:- There are merge conflicts during engine upgrade
- There’s an API-breaking change between major versions and you need to adapt your customization to the new API.
- Narrowing the search results for a specific set of changes
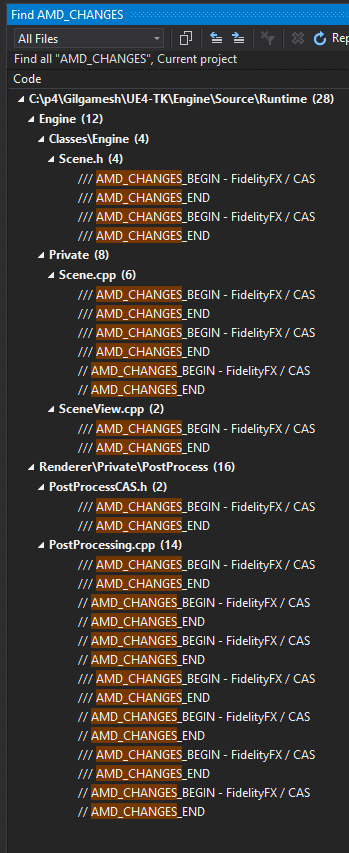
If there were changes other than FidelityFX / CAS, they would show up in this search list, clearly marking which changes modified which file
Finally, we need to figure out how to upgrade the engine after we make some modifications to the original source. As you may have noticed, Epic Games is using GitHub and git to distribute UE4 releases and we are using Perforce to version control the game project.
How do we mix these?
I didn’t get a chance to personally test the workflow, but the [3] Gamasutra: An Unholy Alliance: Unreal Engine, Github & Perforce resource lays out a pretty decent (in my opinion) way to do this:
- Start with a stock UE4 base source
- Modify the engine
- Update perforce with changes
- Create an offline branch of UE4 with git locally
- Alternatively you can push this to your own server somewhere if you want to keep an online git branch for your modifications
- Commit your changes to git as well
When its time to upgrade the engine
rebaseyour customization branch on top of the new UE4 release- Resolve conflicts
- Update your git branch
- Update p4 server
Last notes
The post turned out a bit longer than I anticipated but I wanted to keep everything under one page and as concise as possible. Even though there are various great resources out there, I couldn’t find everything I needed under one page so I’ve created this one.
If you have a suggestion on how to improve this workflow, let me know in the comments!