Projectile Motion Tutorial for Arrows and Missiles in Unity3D
Estimated Read Time: ~20 minutes
Quick Navigation
- Introduction
- Scene Setup
- Setting Up Target Locations
- Motion Physics Review
- Launching the Projectile
- Fixing the Projectile Orientation
- References & Additional Material
1 - Introduction
In this tutorial, we’ll take a closer look at the motion physics of arrows and missiles. The tutorial will walk you through creating a demo scene for launching a projectile (capsule) to a target location (platform). If you want to play around with it yourself, the project files can be found on GitHub. You can also see it in action as a WebGL build is also available.
We’ll be using kinematics to achieve our goal, meaning that we’ll only be using velocity in our calculations, disregarding the mass and other acting physical forces on the object that would affect the motion such as drag. To launch the projectile to its target, we will be considering the following variables:
| Variable Name | Type | Symbol |
|---|---|---|
| Launch Velocity | Vector3 |
V0 |
| Launch Angle in Degrees | float |
α |
| Distance to Target | float |
R |
By keeping the other two variables known beforehand, we can calculate any of the variables above. Specifically, we can calculate
- the velocity, if we know where the target is and what the launch angle will be
- the launch angle, if we know how fast we’ll be launching the projectile and where the target is
- the distance the projectile will travel, if we know the launch velocity and the launch angle
We’ll start the tutorial with setting up the scene. I’ve used Unity v2017.3.0f3 at the time of preparing this.
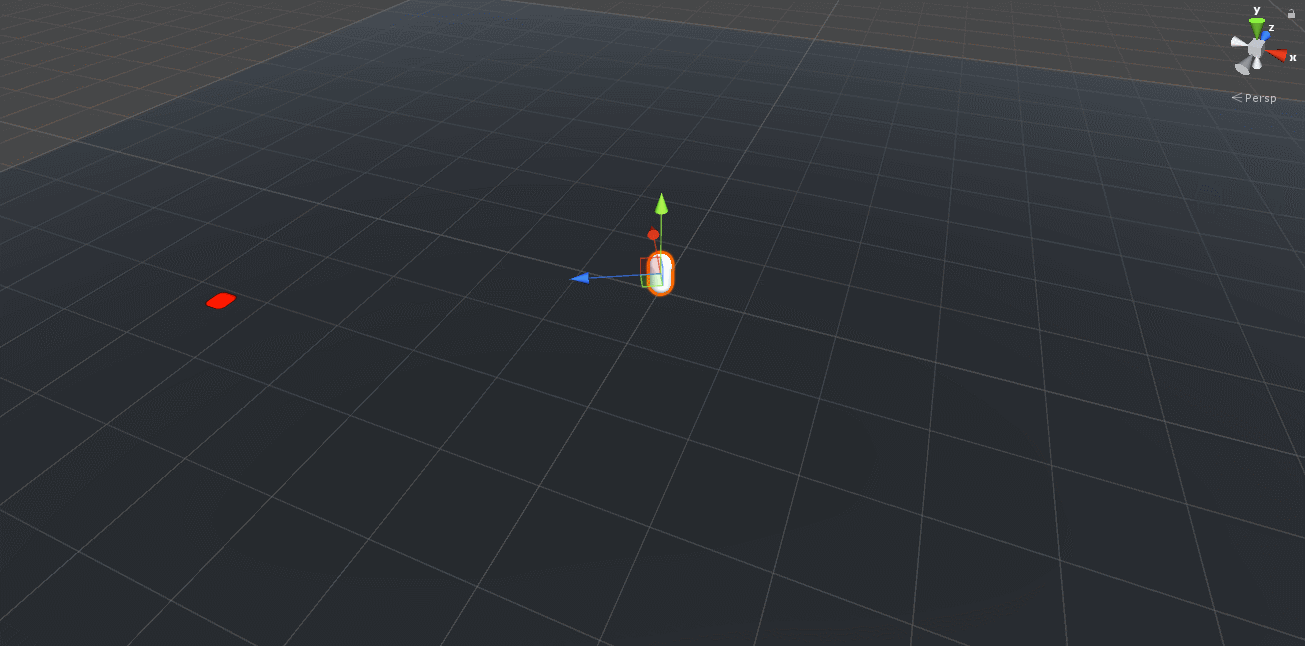
2 - Scene Setup
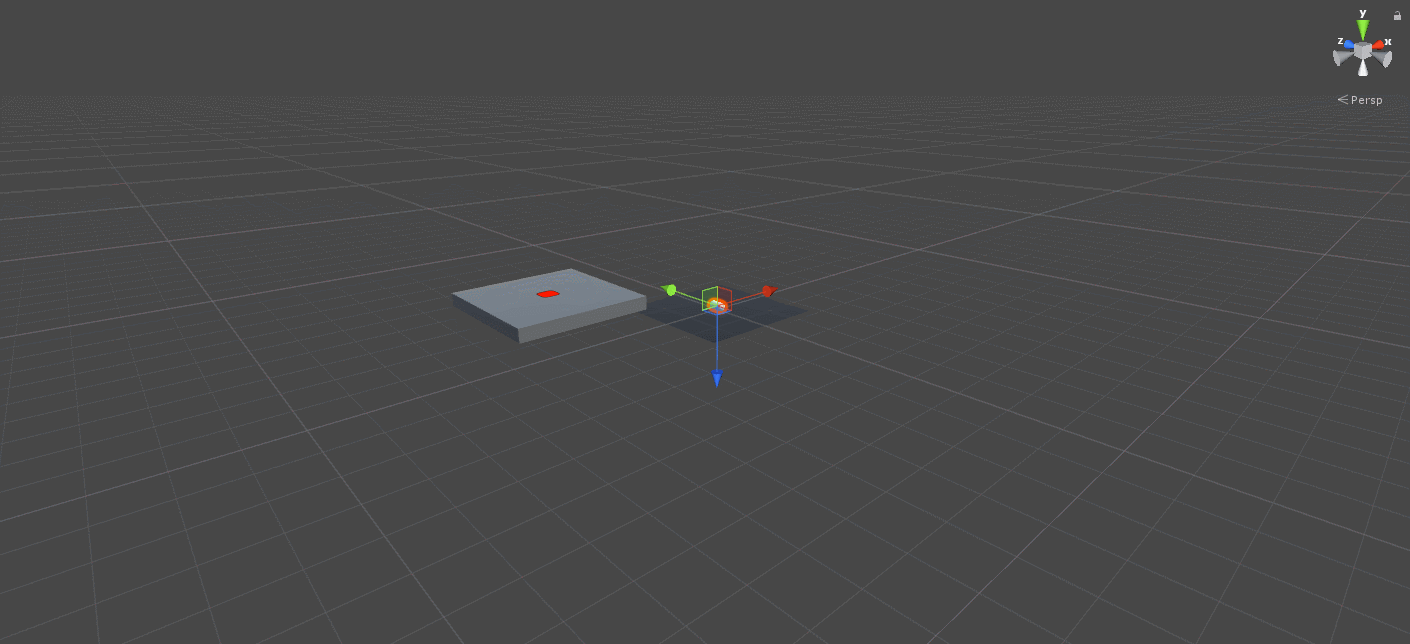
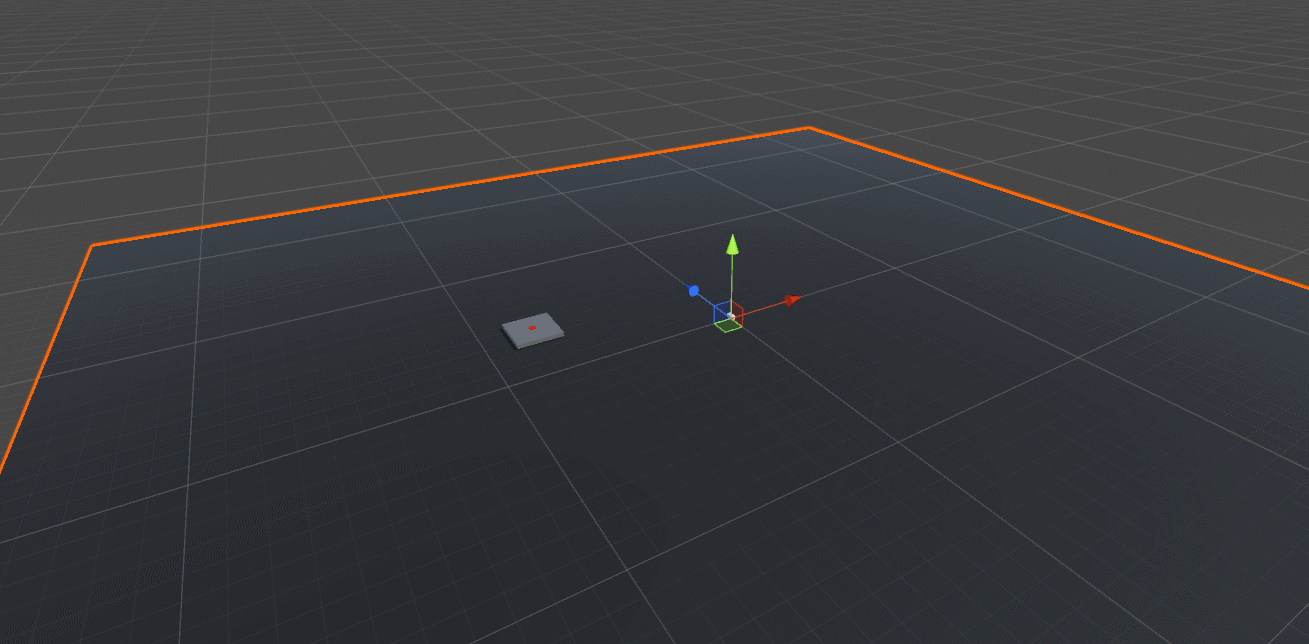
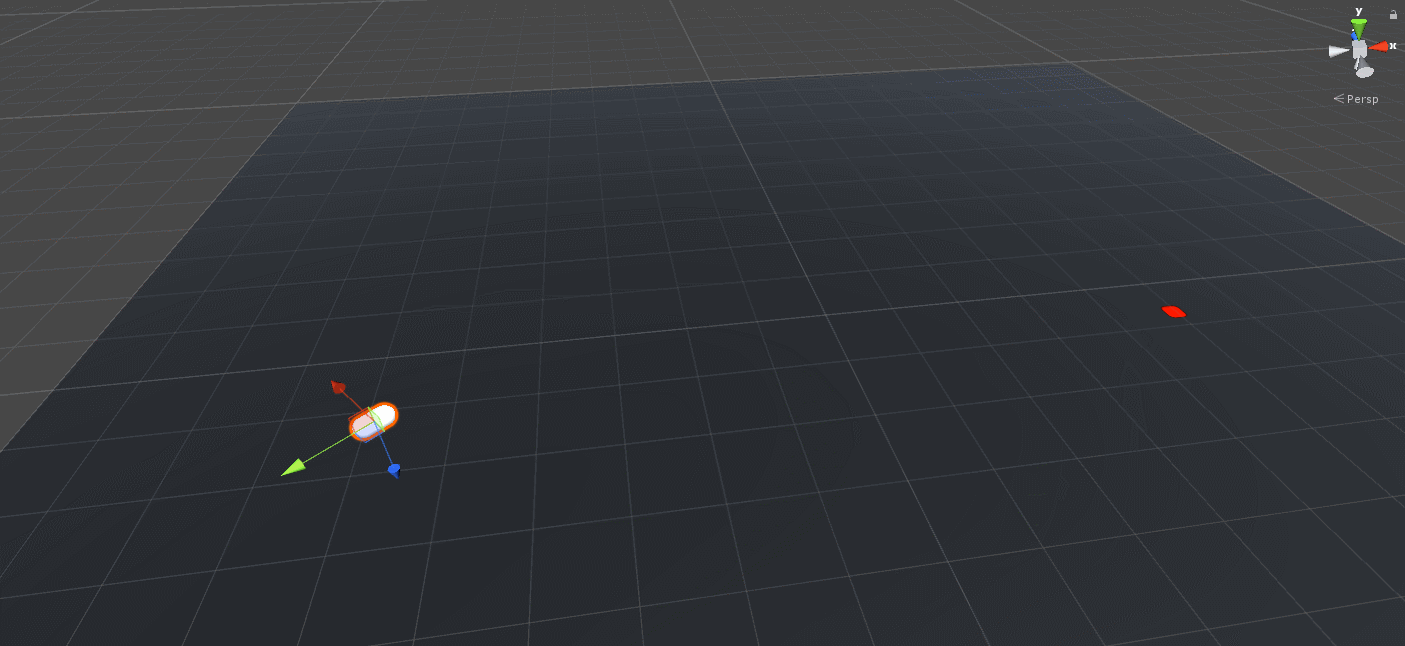
We start by creating a small scene with a few objects: a ground plane, a projectile capsule and a target object which is a platform with a red mark.
Scene Setup: Ground, Projectile and Target Location objects
After launching Unity3D and creating a new project:
- Set camera position to
(0, 5, -15)and rotation to(30, 0, 0).- Also, set Clear Flags from
SkyboxtoSolid Colorfor a less distracting background in play mode.
- Also, set Clear Flags from
- To add a ground, add a
Plane, reset its transform and adjust its scale to(2, 2, 2).- Add a material and attach it to the plane to color it dark gray (or as you will).
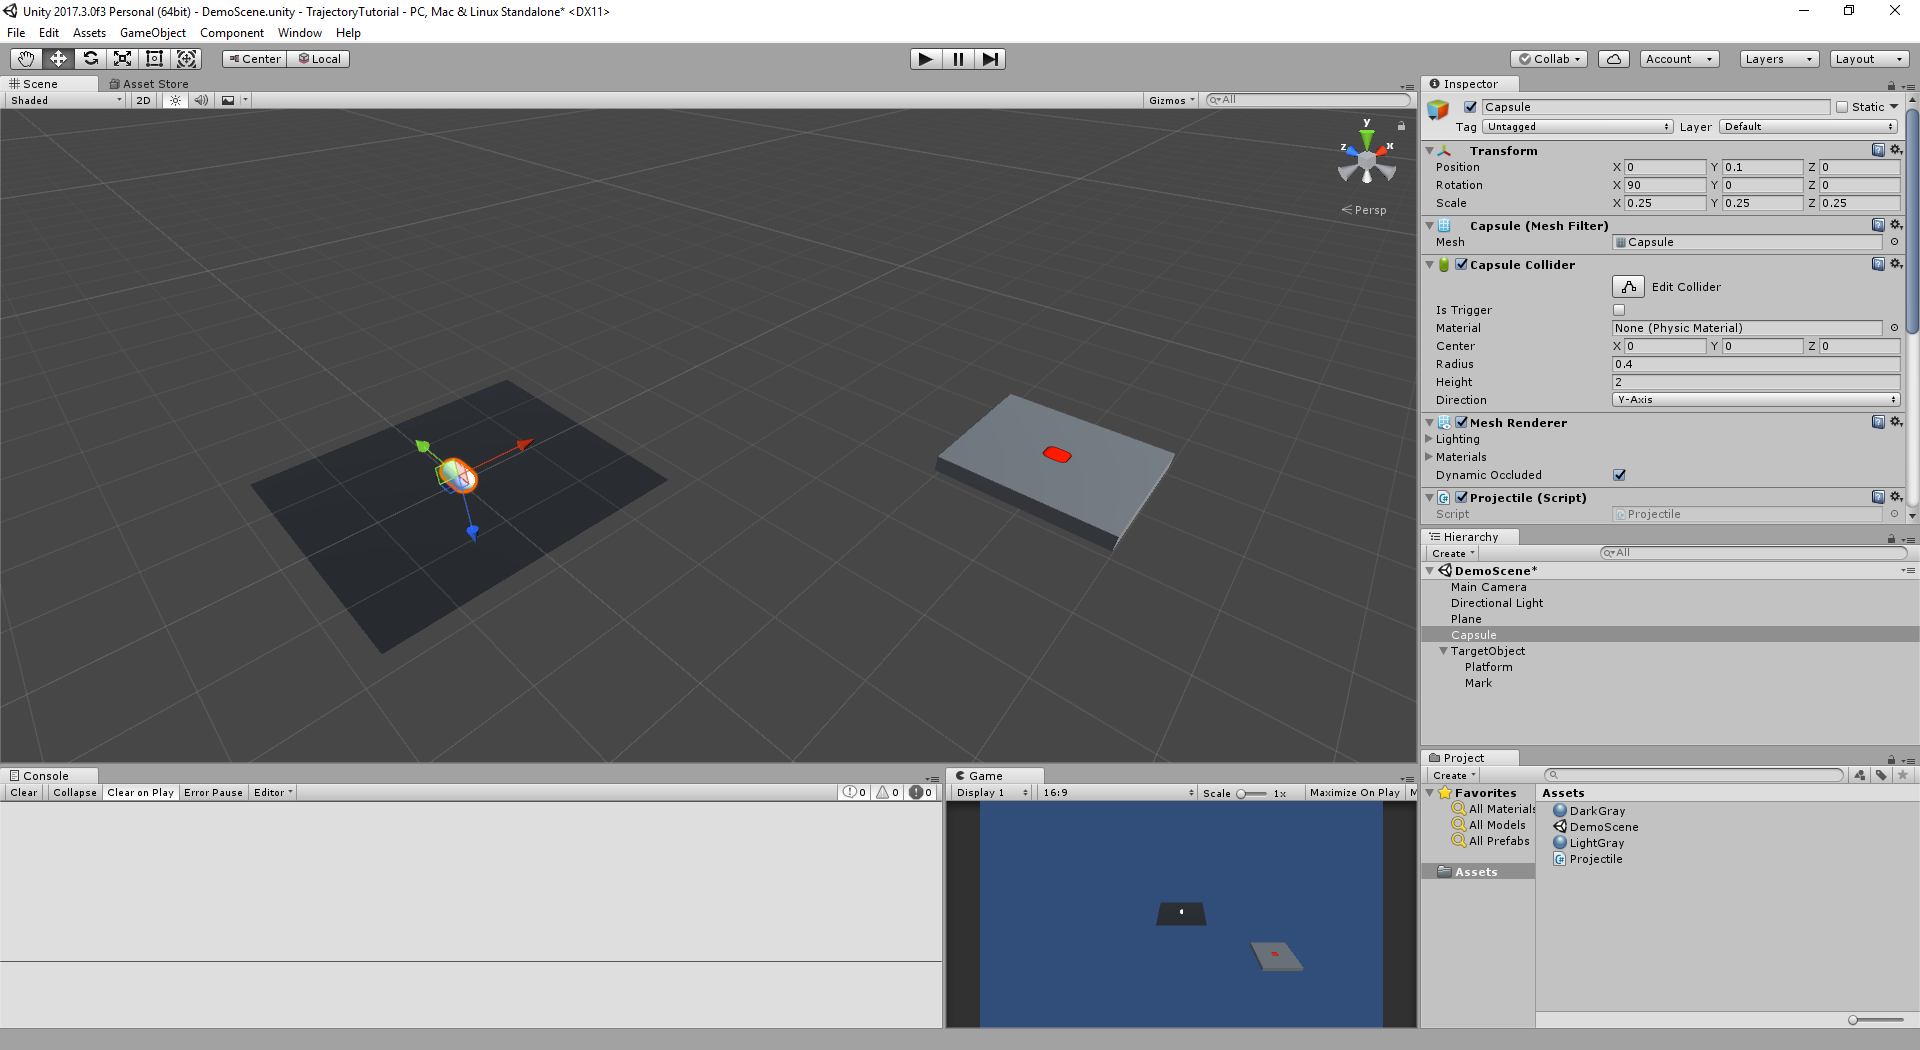
- For the projectile, add a
Capsule. Place it on position(0, 0.25, 0), rotate it(90, 0, 0)and scale it to(0.5, 0.5 ,0.5).- Add a
Rigidbodycomponent to the capsule. We’ll need this for setting the velocity of the object. - Create a C# script: Projectile.cs and attach to the capsule object.
- Add a
- For the target, let’s create a platform with a red mark on it.
- Create an Empty Game Object at the root of the scene hierarchy, name it “TargetObject” and place it at position
(5, 0, -5). - Create a cube object, name it to “Platform”. Set its scale to
(0, 0.2, 0)and position to(0, 0.2, 0)to elevate it from the ground a little bit.- Add a material and attach it to the cube object to color the target platform light gray (or as you will).
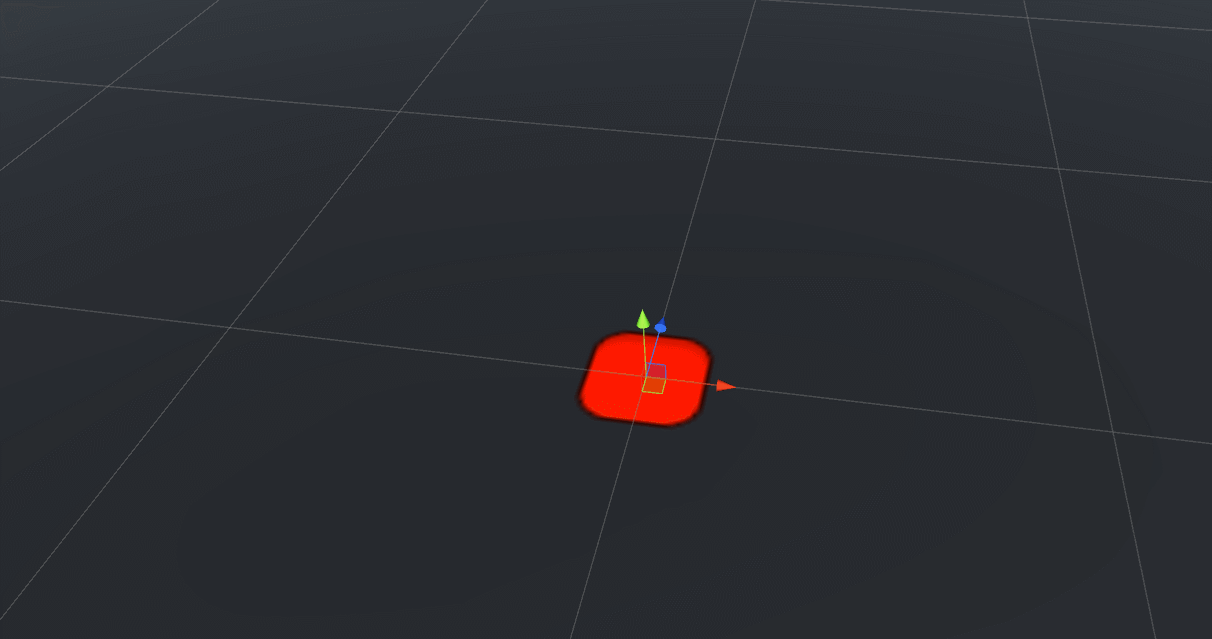
- For a red target mark that would show the current target location, create an empty GameObject and name it to “Mark”.
- Set its position to
(0, 0.31, 0)*, rotation(90, 0, 0)and scale to(2, 2, 0). - Add a Sprite Renderer and set Sprite to
InputFieldBackgroundand Color to red.
- Set its position to
- Create an Empty Game Object at the root of the scene hierarchy, name it “TargetObject” and place it at position
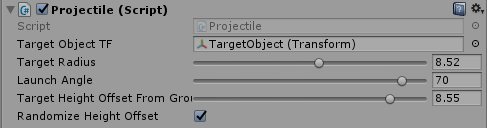
We want to implement the following behavior for the projectile in the Projectile.cs file:
- We want to cycle through setting a new target location and launching the projectile to the target when Spacebar is pressed. Since our projectile will be in one of the two states of setting a new target and launching, we’ll use the
bool bTargetReadyvariable to keep track of the state. The projectile will also reset its position to initial position after settings up the new target. - For a random point around the projectile as the target location, we’ll pick a point in a circle surrounding the world origin denoted by the radius
float TargetRadius. We can then add some random height to this random target to end up with a 3D location around the projectile. We’ll look into this in the next section. - To calculate the launch speed of the projectile, we’ll use two variables:
float LaunchAngleandTransform TargetObject. - The R key will be used to reset the projectile’s position and rotation to their initial values. For this, we’ll cache the initial position and orientation in
Vector3 initialPositionandQuaternion initialRotationat the beginning. When resetting the object, velocity will also be set to 0.
Let’s start with the Update() function:
using UnityEngine;
using System.Collections;

public class Trajectory : MonoBehaviour
{
    // launch variables
    [SerializeField] private Transform TargetObject;
    [Range(1.0f, 6.0f)] public float TargetRadius;
    [Range(20.0f, 75.0f)] public float LaunchAngle;

    // state
    private bool bTargetReady;

    // cache
    private Rigidbody rigid;
    private Vector3 initialPosition;
    private Quaternion initialRotation;

    // Use this for initialization
    void Start()
    {
        rigid = GetComponent<Rigidbody>();
        bTargetReady = true;
        initialPosition = transform.position;
        initialRotation = transform.rotation;
    }

    // launches the object towards the TargetObject with a given LaunchAngle
    void Launch(){ bTargetReady = false; }

    // Sets a random target around the object based on the TargetRadius
    void SetNewTarget(){ bTargetReady = true; }

    // resets the projectile to its initial position
    void ResetToInitialState()
    {
        rigid.velocity = Vector3.zero;
        this.transform.SetPositionAndRotation(initialPosition, initialRotation);
        bTargetReady = false;
    }

    // Update is called once per frame
    void Update ()
    {
        if (Input.GetKeyDown(KeyCode.Space))
        {
            if (bTargetReady)
            {
                Launch();
            }
            else
            {
                ResetToInitialState();
                SetNewTarget();
            }
        }

        if (Input.GetKeyDown(KeyCode.R))
        {
            ResetToInitialState();
        }
    }
}
Remember we have to assign the target object and set the initial values for the launch parameters from the unity editor. Drag and drop the target object onto the Projectile.cs script’s TargetObject field after selecting the Capsule object. 8.5 units for TargetRadius and 70 degrees for LaunchAngle are good initial values for the parameters. If you forget to set the TargetObject, you’ll get UnassignedReferenceException: TargetObject has not been assigned errors.

3 - Setting Up Target Locations
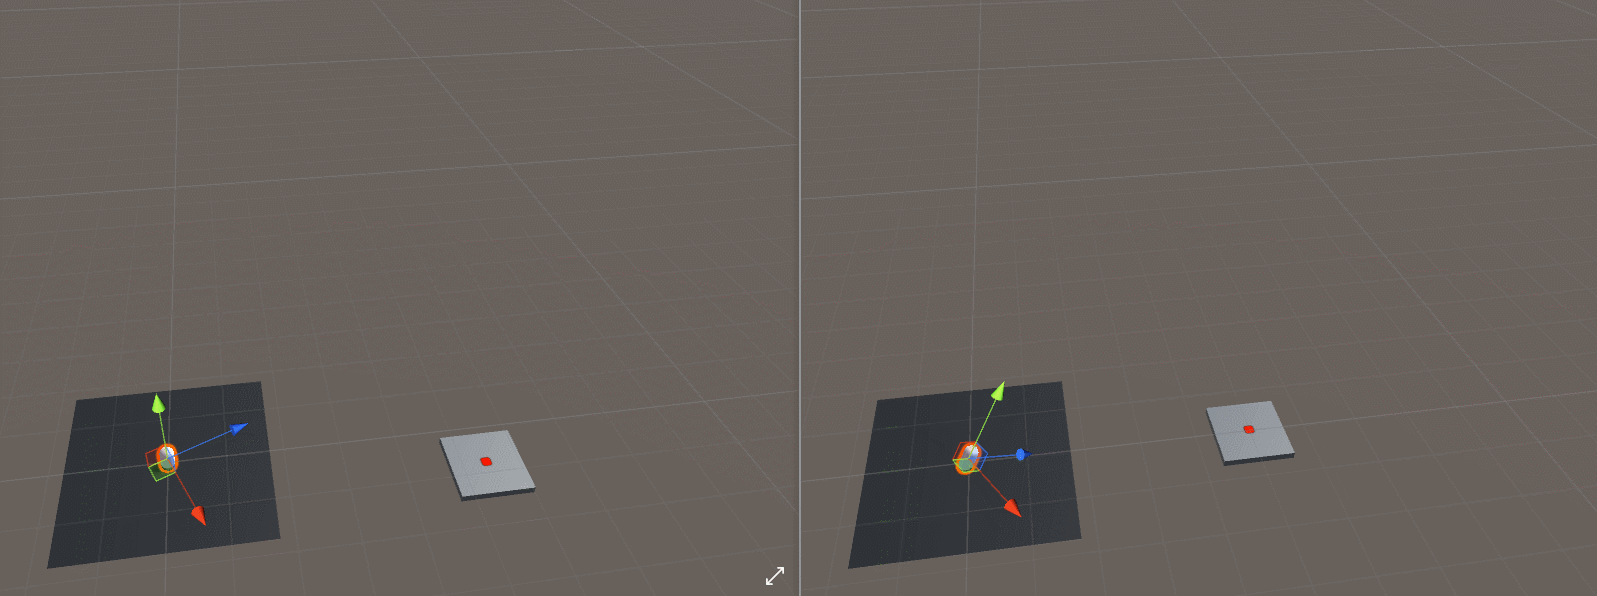
We want to randomly pick a point for the target location. Let’s start with 2D and use a circle, which is centered in the world origin (0, 0, 0).
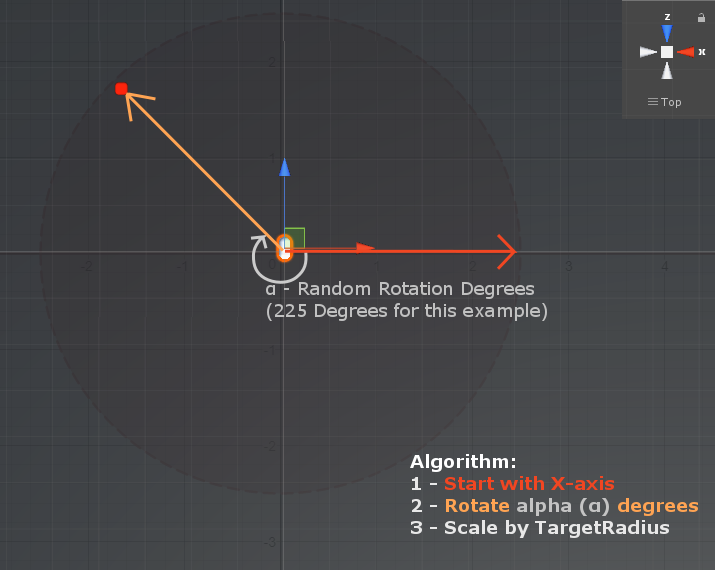
Start with the Right vector (1, 0, 0) in the XZ-Plane, which also happens to be our ground plane in the scene. Rotate the Right vector a random amount of degrees along Y-axis. Finally, scale the rotated vector by the TargetRadius parameter to make the circle larger or smaller. Feel free to play with the this parameter to see what it does.
Note that since Unity uses a left-handed coordinate system (X-right, Y-up and Z-forward) for the world space, a positive rotation (along Y-Axis) is a clockwise rotation of the Right vector (1, 0, 0).
The C# function to implement the algorithm would be as follows:
// Sets a random target around the object based on the TargetRadius
void SetNewTarget()
{
    Transform targetTF = TargetObjectTF.GetComponent<Transform>(); // shorthand

    // To acquire our new target from a point around the projectile object:
    // - we start with a vector in the XZ-Plane (ground), let's pick right (1, 0, 0).
    //   (or pick left, forward, back, or any perpendicular vector to the rotation axis, which is up)
    // - We'll use a quaternion to rotate our vector. To create a rotation quaternion, we'll be using
    //   the AngleAxis() function, which takes a rotation angle and a rotation amount in degrees as parameters.
    Vector3 rotationAxis = Vector3.up;  // as our object is on the XZ-Plane, we'll use up vector as the rotation axis.
    float randomAngle = Random.Range(0.0f, 360.0f);
    Vector3 randomVectorOnGroundPlane = Quaternion.AngleAxis(randomAngle, rotationAxis) * Vector3.right;

    // - scale the randomVector with the target radius
    // - we also add an offset which makes the starting position at the same height level as the target
    Vector3 randomPoint = randomVectorOnGroundPlane * TargetRadius + new Vector3(0, targetTF.position.y, 0);

    //  - finally, we'll set the target object's position and update our state.
    TargetObject.SetPositionAndRotation(randomPoint, targetTF.rotation);
    bTargetReady = true;
}
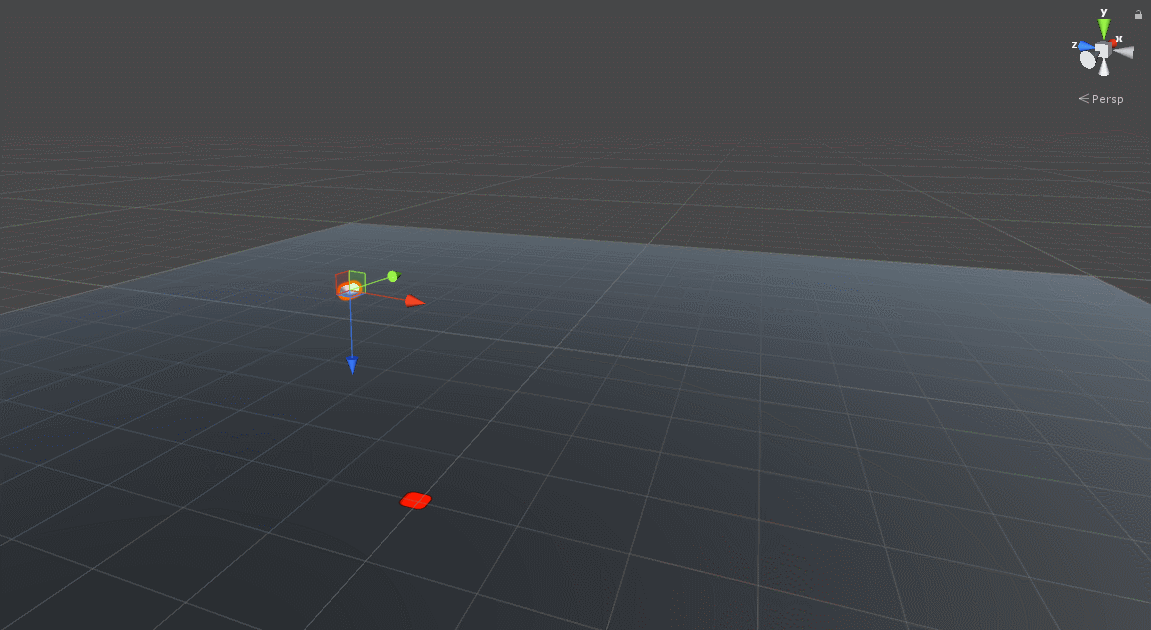
The ground plane is scaled up so that it’s easier to see in the screenshot above that the random position of the target platform indeed lies on a circle around the projectile.
Let’s add some randomness to the height of the projectile. We can use two variables to control the randomness:
- A
boolto toggle randomization of the height offset - A
floatto denote the range of the height offset we’re going to add to the newly acquired target position
    // launch variables
    // ...
    [Range(0.0f, 10.0f)] public float TargetHeightOffsetFromGround;
    public bool RandomizeHeightOffset;
Let’s turn on the randomness toggle and use 8.5f as the offset amount for the target object height. We will get a random offset value somewhere between 20% and 100% of the specified offset value. We will also make it randomly above or below the ground by multiplying the height with either -1.0f or 1.0f.
Now, let’s use the randomness control parameters to add a positive or a negative height offset to the target location.
// Sets a random target around the object based on the TargetRadius
void SetNewTarget()
{
    // ...
    // Add a random offset to the height of the target location:
    // - If the RandomizeHeightOffset flag is turned on, pick a random number between 0.2f and 1.0f to make sure
    //    we're somewhat above or below the ground. If the flag is off, just pick 1.0f. Finally, scale this number
    //    with the TargetHeightOffsetFromGround.
    // - We want to randomly determine if the target is above or below ground.
    //    Randomly assign the multiplier -1.0f or 1.0f
    // - Create an offset vector from the random height and add the offset vector to the random point on the plane
    float heightOffset = (RandomizeHeightOffset ? Random.Range(0.2f, 1.0f) : 1.0f) * TargetHeightOffsetFromGround;
    float aboveOrBelowGround = (Random.Range(0.0f, 1.0f) > 0.5f ? 1.0f : -1.0f);
    Vector3 heightOffsetVector = new Vector3(0, heightOffset, 0) * aboveOrBelowGround;
    Vector3 randomPoint = randomVectorOnGroundPlane * TargetRadius + heightOffsetVector;
    //...
}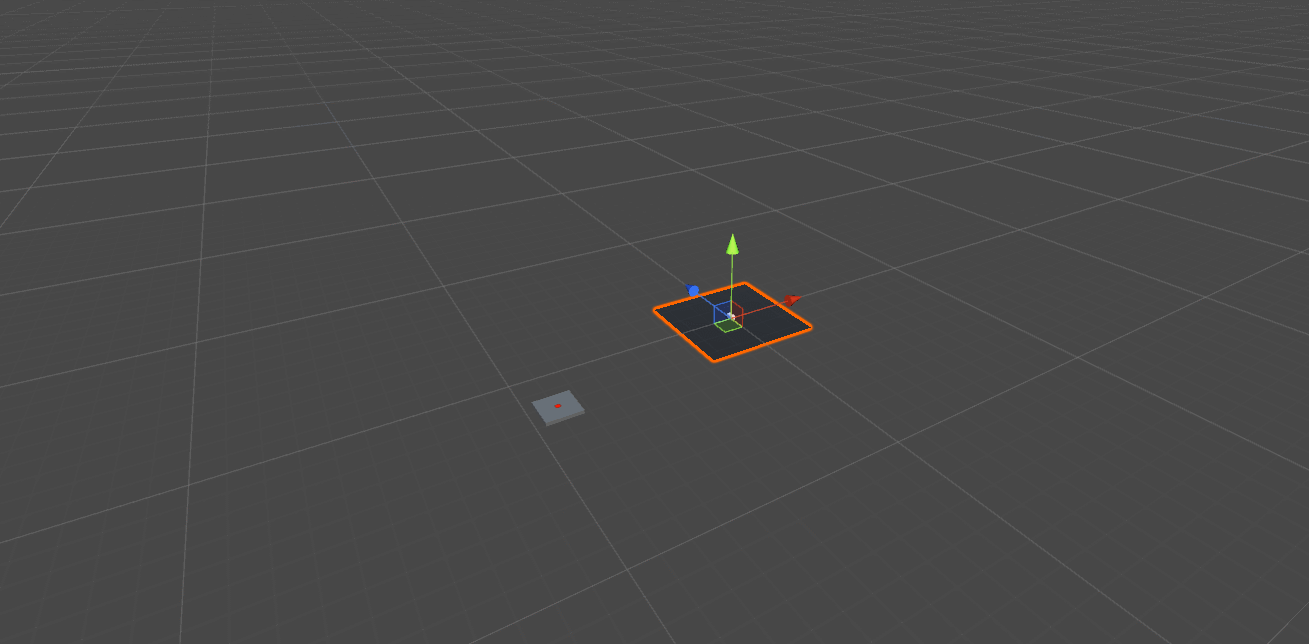
The plane is still scaled up a little bit from its original scale value of (0.25, 0.25, 0.25) in this screenshot. Note that the target platform briefly gets the shadow from the ground plane when it is below the launch platform.
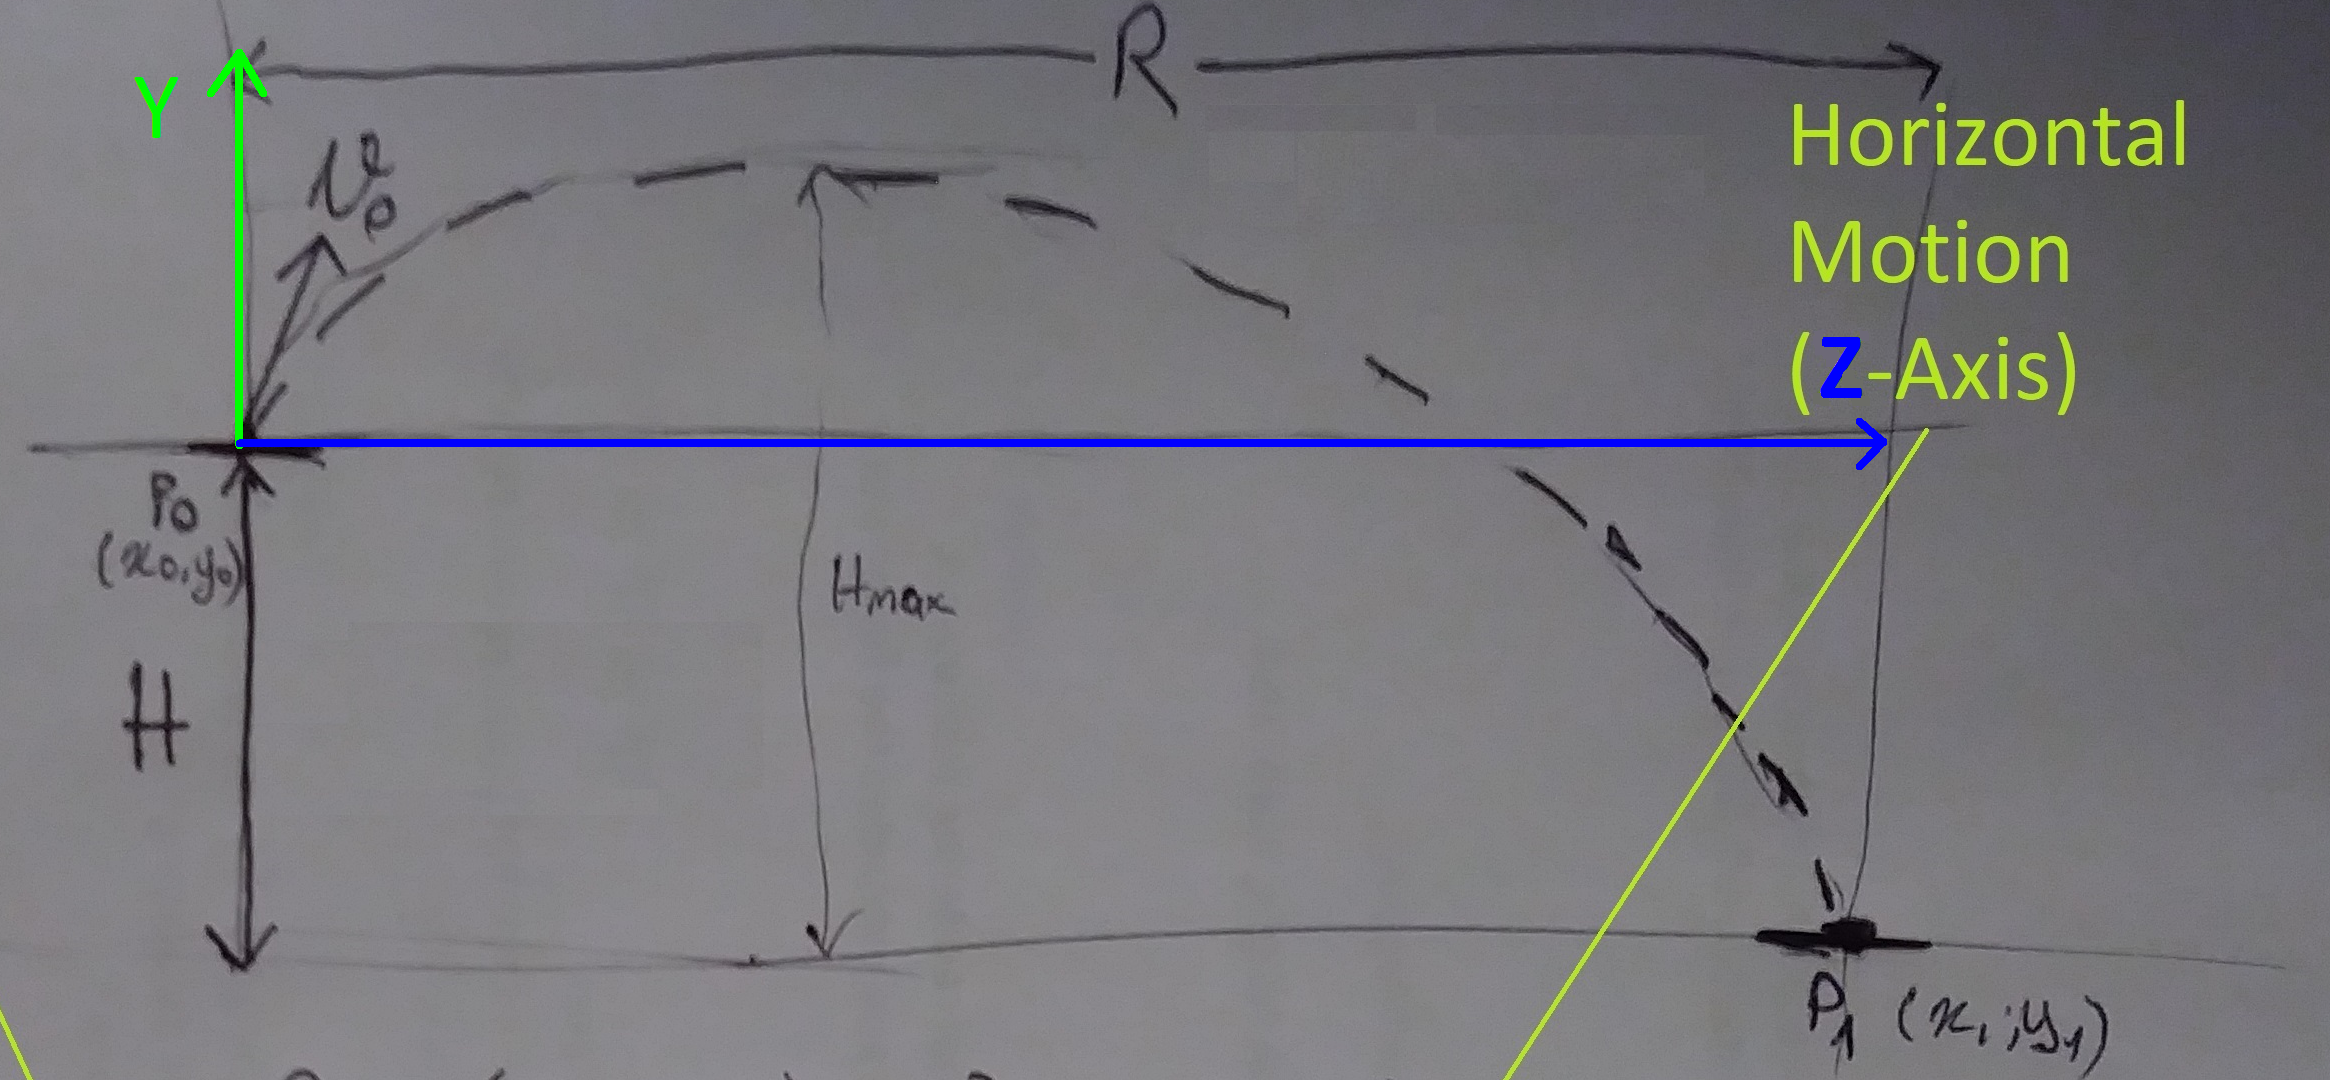
4 - Motion Physics Review
Before we get into the code for the Launch() function, let’s review some physics to make sure we fully understand how the function works. We’ll begin with a kinematic equation of the motion that describes the position based on the intial velocity and acceleration:
| P1 = P0 + v0 t + 0.5 a t2 | |
|---|---|
| P1 | Final position of the object |
| P0 | Initial position of the object |
| v0 | Initial velocity of the object |
| a | Acceleration of the object |
| t | Duration of the movement |
Now let’s look at projectile motion:
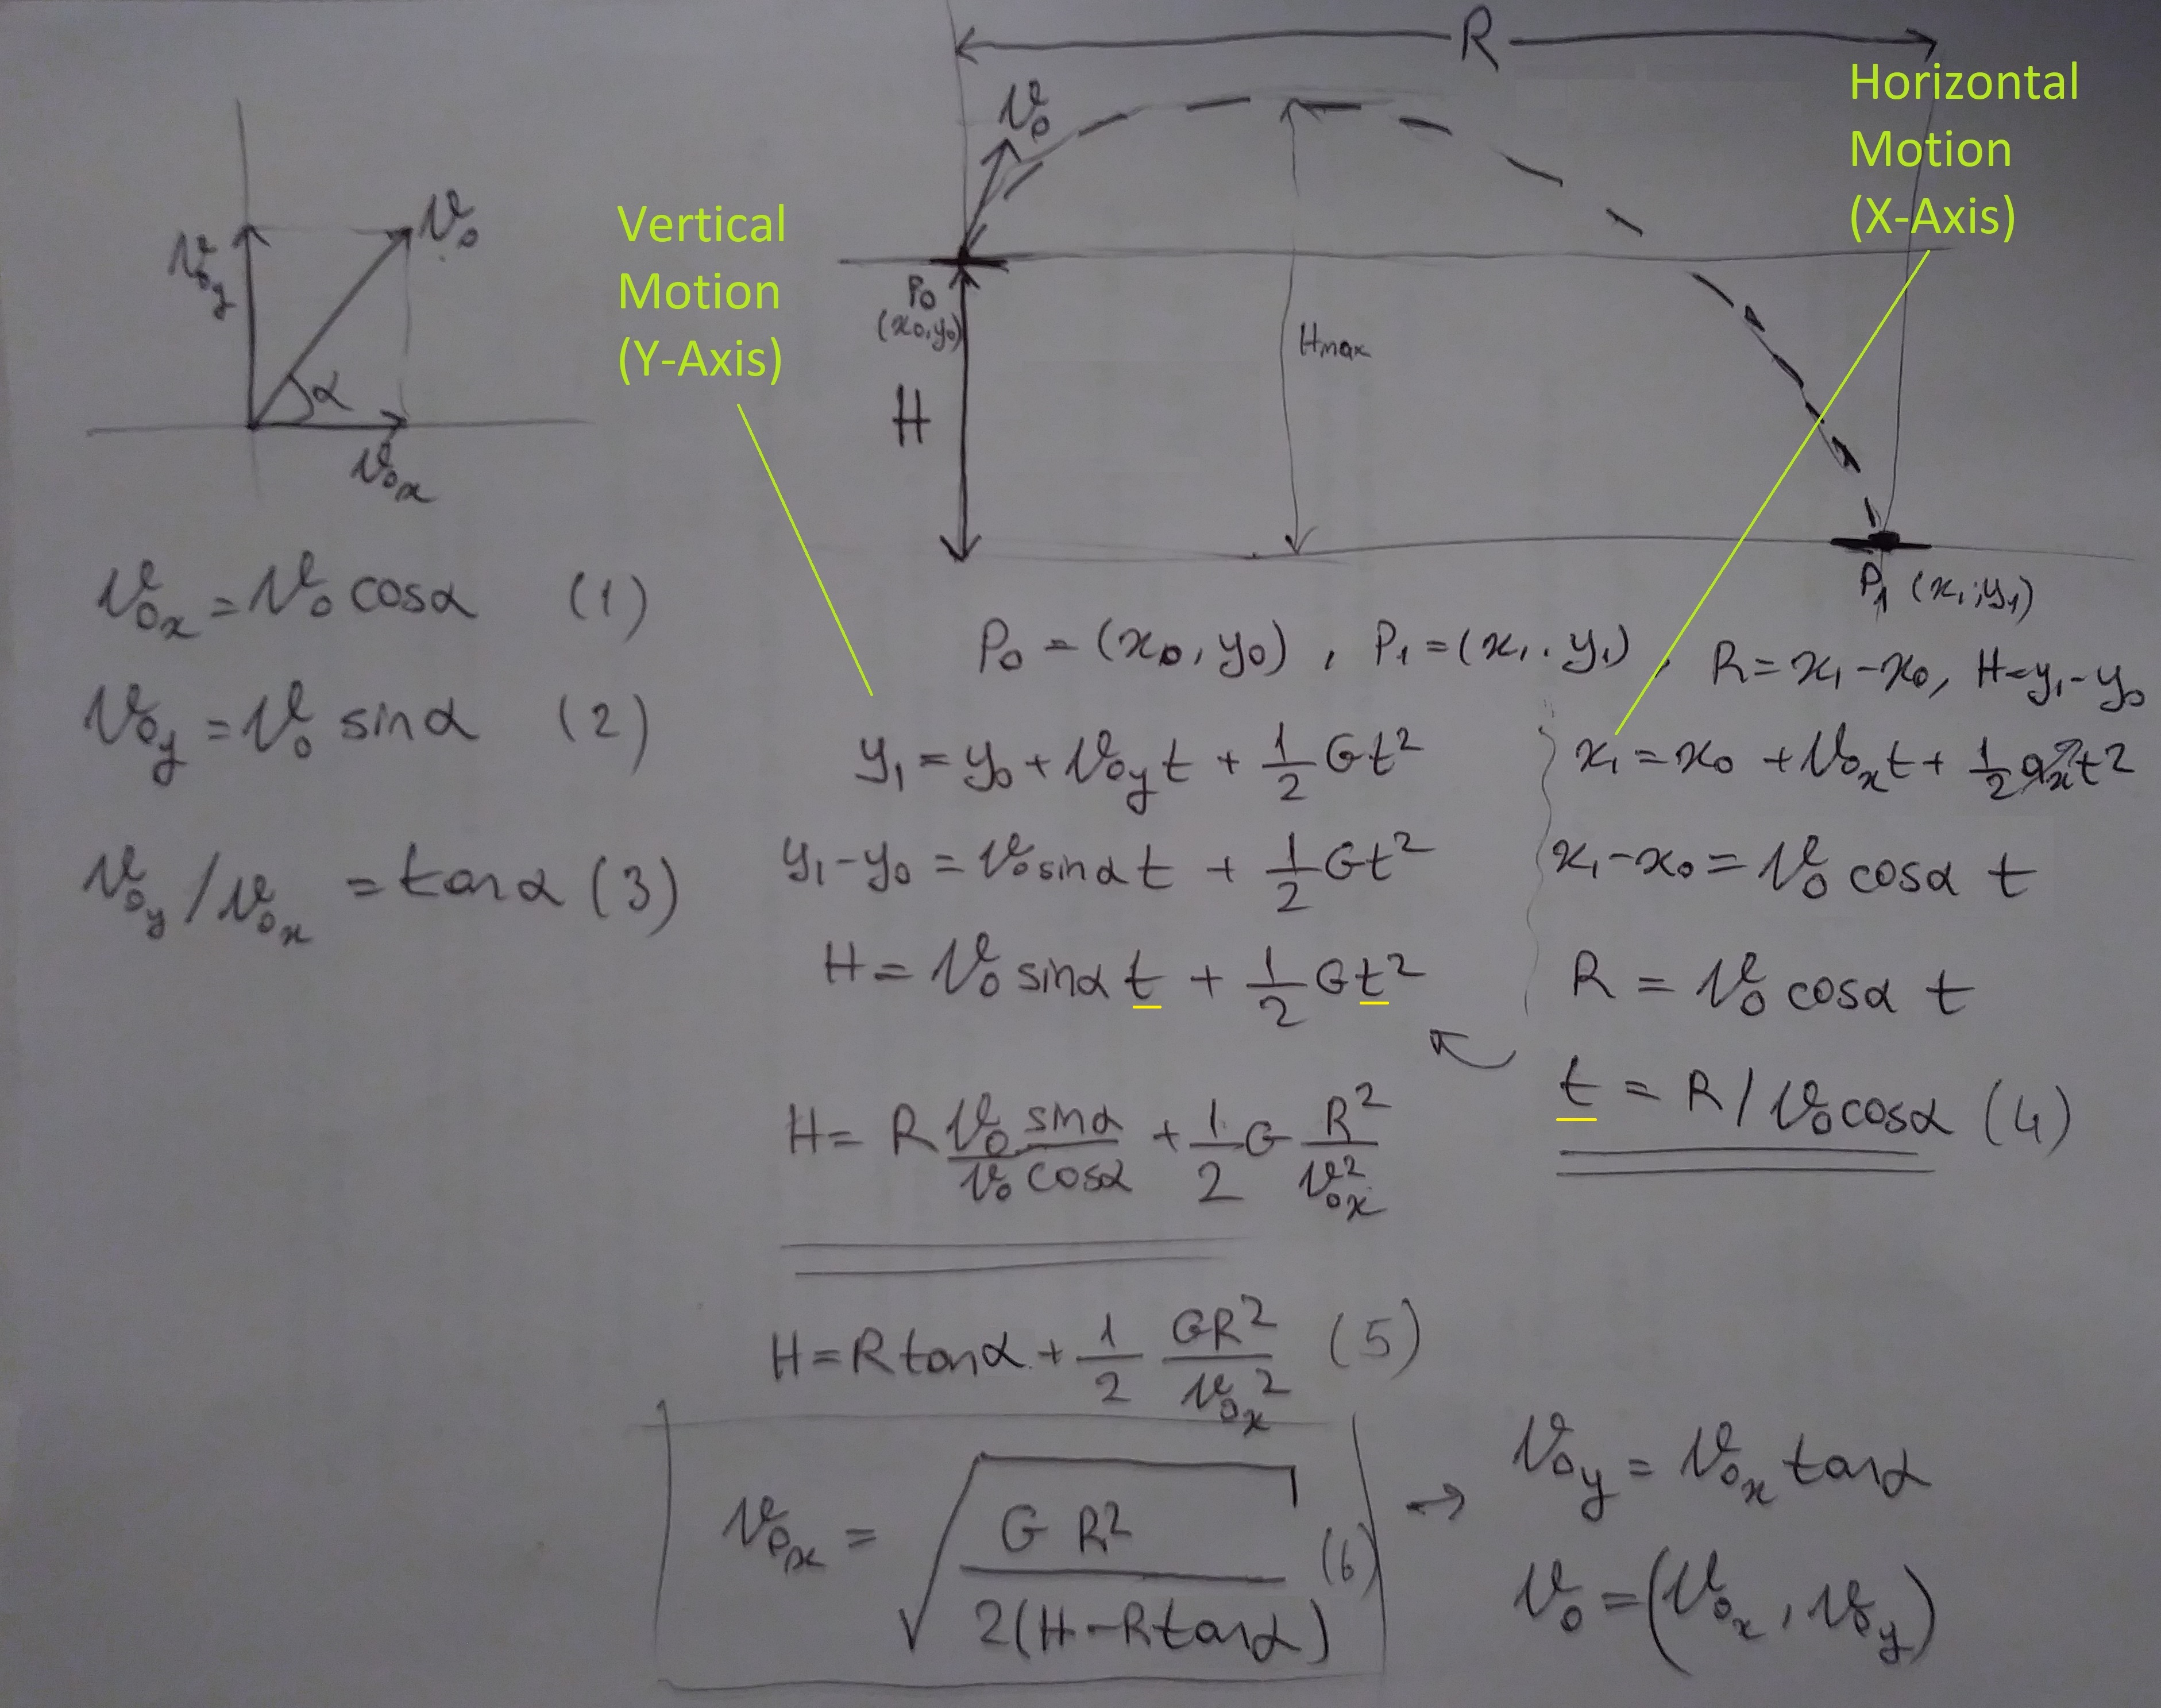
A breakdown of the variables are as follows:
| α | Launch angle |
| V0 | Initial velocity |
| V0x , V0y | X and Y components of the intial velocity |
| H | The positional difference in Y-axis (final - initial) |
| R | The positional difference in X-axis (final - initial) |
| t | Let’s also consider the time t during which the projectile motion occurs. |
Equations (1), (2) and (3) use trigonometric definitions on the initial velocity.
We look at the motion in two components: x and y axes. We plug in the horizontal and vertical velocity components to the kinematic equation. The x and y component yield us a relation between
- the distance traveled along the x axis R, the x component of the initial velocity V0x and the time of the trajectory motion t.
- the distance traveled along the y axis H, the y component of the initial velocity V0y, gravity G and the time of the trajectory motion t.
Then we use plug t in the relation that we obtained for the y component of the position earlier. This will yield us a relation between
- the distance traveled along the y axis H, x axis R, gravity G, launch angle α and the x component of the initial velocity V0x.
Using trigonometric functions in (1), (2), and (3); together with what we’ve obtained with kinematic equations in (4) and (5), we end up with the final equations (6)
V0x = √ GR2 / 2(H - R tan(α))
V0y = V0x tan(α)
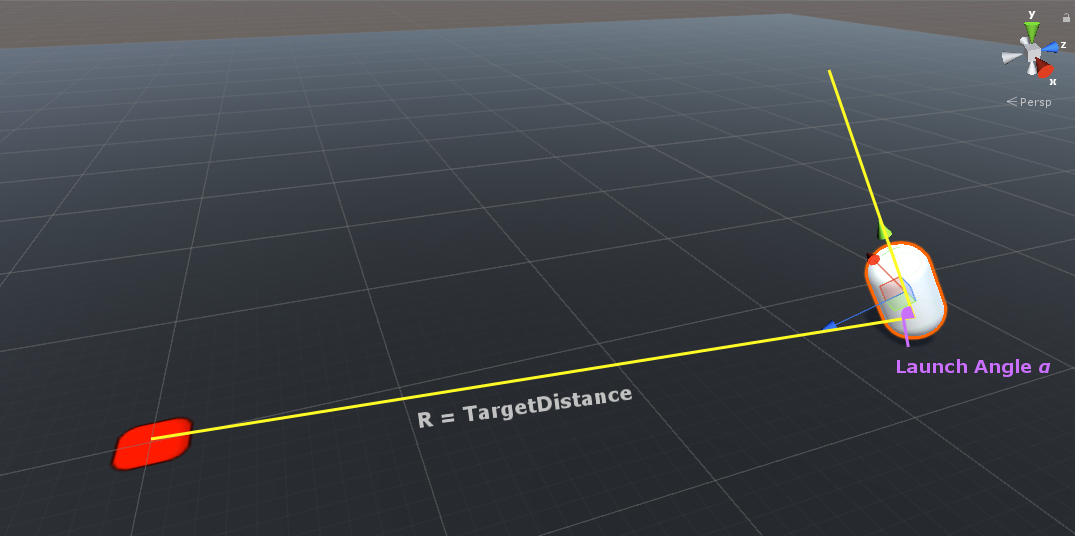
5 - Launching the Projectile
We have solved the kinematics problem in the previous section and if you recall, we have used X and Y directions in the trajectory figures to denote forward and up. Let’s re-imagine the axes on the trajectory figure.
If we assume that
- where we are looking is the forward
(0, 0, 1)direction for us - the opposite of gravity vector is up
(0, 1, 0) - if we strecth out our right arm it would point in the right
(1, 0, 0)direction
we would define the local space vectors for us. Now, we can use the local space vectors with the kinematic equation we’ve acquired earlier.
If we can somehow align the forward vector of the projectile point towards the target location, we can apply the formula directly to solve the launching problem! Unity provides a Transform.LookAt() function to achieve exactly this.
void Launch()
{
    // rotate the object to face the target
    transform.LookAt(TargetObject.position);

    // ...
}
Notice that this seems to work for the targets on the same plane, but there’s an error in the logic.
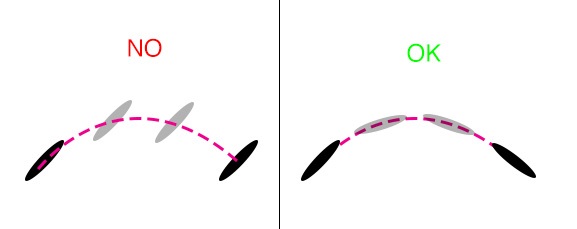
We don’t actually want the projectile to look directly at the target (local forward vector points to the target). We want the projectile to turn towards the target object while keeping its local up vector still pointing in the global up vector.
Let’s consider the case where the target object has different height than the projectile. While we want the behavior on the left in the gif below, we would get the behavior on the right if we use the LookAt() function shown above.
We can achieve the intended ‘turn around’ behavior if we discard the Y component of the target and projectile positions like this
void Launch()
{
    // think of it as top-down view of vectors:
    //   we don't care about the y-component(height) of the initial and target position.
    Vector3 projectileXZPos = new Vector3(transform.position.x, 0.0f, transform.position.z);
    Vector3 targetXZPos = new Vector3(TargetObjectTF.position.x, 0.0f, TargetObjectTF.position.z);

    // rotate the object to face the target
    transform.LookAt(targetXZPos);

    // ...
}
Now that the vectors are aligned, we can now calculate the initial velocity for launch since we know all the variables for the solution:
V0x = √ GR2 / 2(H - R tan(α)) , V0y = V0x tan(α)
| G | Physics.gravity.y; |
| tan(α) | Mathf.Tan(LaunchAngle * Mathf.Deg2Rad); // in radians |
| R | Vector3.Distance(projectileXZPos, targetXZPos); |
| H | TargetObjectTF.position.y - transform.position.y; |
void Launch()
{
    // ...

    // shorthands for the formula
    float R = Vector3.Distance(projectileXZPos, targetXZPos);
    float G = Physics.gravity.y;
    float tanAlpha = Mathf.Tan(LaunchAngle * Mathf.Deg2Rad);
    float H = (TargetObjectTF.position.y + GetPlatformOffset()) - transform.position.y;

    // calculate initial speed required to land the projectile on the target object
    float Vz = Mathf.Sqrt(G * R * R / (2.0f * (H - R * tanAlpha)) );
    float Vy = tanAlpha * Vz;

    // create the velocity vector in local space and get it in global space
    Vector3 localVelocity = new Vector3(0f, Vy, Vz);

    // ...
}
We can easily translate the local-space velocity vector into global-space using the Transform.TransformDirection() function, which the physics system expects its vectors to be in. Once we transform the vector, we just set the velocity of the rigidbody of the projectile and flip the launch state.
Here’s the Launch() function in one piece:
// launches the object towards the TargetObject with a given LaunchAngle
void Launch()
{
    // think of it as top-down view of vectors:
    //   we don't care about the y-component(height) of the initial and target position.
    Vector3 projectileXZPos = new Vector3(transform.position.x, 0.0f, transform.position.z);
    Vector3 targetXZPos = new Vector3(TargetObjectTF.position.x, 0.0f, TargetObjectTF.position.z);

    // rotate the object to face the target
    transform.LookAt(targetXZPos);

    // shorthands for the formula
    float R = Vector3.Distance(projectileXZPos, targetXZPos);
    float G = Physics.gravity.y;
    float tanAlpha = Mathf.Tan(LaunchAngle * Mathf.Deg2Rad);
    float H = TargetObjectTF.position.y - transform.position.y;

    // calculate the local space components of the velocity
    // required to land the projectile on the target object
    float Vz = Mathf.Sqrt(G * R * R / (2.0f * (H - R * tanAlpha)) );
    float Vy = tanAlpha * Vz;

    // create the velocity vector in local space and get it in global space
    Vector3 localVelocity = new Vector3(0f, Vy, Vz);
    Vector3 globalVelocity = transform.TransformDirection(localVelocity);

    // launch the object by setting its initial velocity and flipping its state
    rigid.velocity = globalVelocity;
    bTargetReady = false;
}
Aaand here we GO!
Wait… That’s not right… But at least we jump in the right direction and land on the target location so that’s a clear win for this section!
6 - Fixing the Projectile Orientation
Obviously, if we’re firing arrows or missiles, we would like the projectile to have a proper orientation during the motion, shown below.
Transform.LookAt() changes the orientation of the missile to align its local forward vector to point in the target’s direction. Once we set the velocity, we are not updating the orientation of the projectile. We can solve this issue by using the collider component to detect if the missile is touching the ground and update its rotation based on its velocity vector.
We’ll add the following to Projectile.cs script:
- Add a new boolean
bTouchingGroundfor keeping track of whether the object is touching the ground or not - Define
OnCollisionEnter()andOnCollisionExit()functions to updatebTouchingGround. - Update the orientation of the object if it is not touching the ground
Quaternion.LookRotation() us the functionality we need: it returns an orientation quaternion that would rotate an object so that its local forward vector would point in the given direction vector.
public class Trajectory : MonoBehaviour
{
    //...

    // state
    private bool bTargetReady;
    private bool bTouchingGround;

    //...

    // Update is called once per frame
    void Update ()
    {
        // ...

        if (!bTouchingGround && !bTargetReady)
        {
            // update the rotation of the projectile during trajectory motion
            transform.rotation = Quaternion.LookRotation(rigid.velocity);
        }
    }

    void OnCollisionEnter()
    {
        bTouchingGround = true;
    }

    void OnCollisionExit()
    {
        bTouchingGround = false;
    }
}
Aaaand…
We’re getting closer, but we’re not quite there yet.
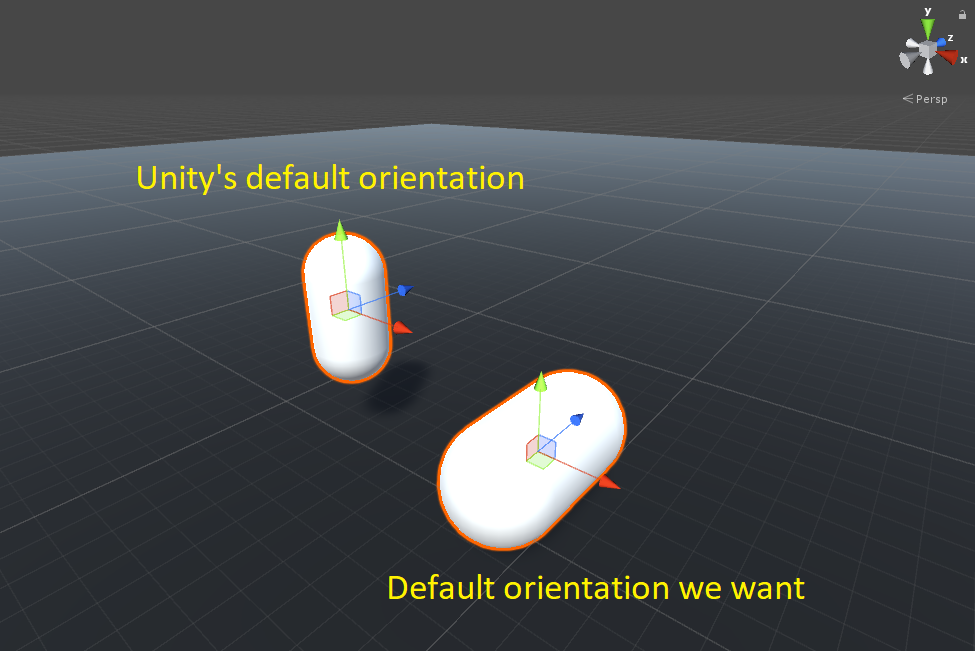
Remember we had to apply the initial rotation of 90 degrees on the X-axis at the beginning? We did that because the cylinder object Unity3D creates is in “standing up” position when its rotation has the default value. In other words, its forward vector is pointing out of the cylinder’s body’s surface in its default orientation. We would like our forward vector to point out of the tip of the cylinder in the default orientation, as shown with global space vectors below:
The neat thing about quaternions is that you can combine them by using the multiplication operator Quaternion.operator*().
We can combine the rotation we get from the Quaternion.LookRotation() function with the initialRotation quaternion to achieve the right trajectory orientation for our capsule object. We combine rotations from right to left, as follows:
transform.rotation = Quaternion.LookRotation(rigid.velocity) * initialRotation;Also note that combining rotations is not a commutative operation, so the order of multiplication matters (A*B != B*A). You can find Trajectory.cs in one piece here
A quick Quaternion reminder here:
The way we achieve ‘combining rotations’ and the details of its math is explained in this Math Stack Exchange Answer and Wikipedia.
This means that
Quaternion.LookRotation(rigid.velocity) * initialRotationwill first applyinitialRotationto the object to achieve the “default orientation we want”, and then apply theLookRotation(rigid.velocity)to rotate the projectile along its trajectory path, projectile’s sharp edge (capsule top) pointing in the velocity direction as shown in the gif right below.I would highly recommend watching Fantastic Quaternions from Numberphile and Quaternion Rotation from Sutrabla on youtube to make sense of quaternions if you feel like you don’t have a firm grasp on them. Then, read further on the Quaternion interface Unity3D provides and the Quaternion script reference fully unlock the potential of quaternions in Unity3D. If you cannot contain your fascination with quaternions like myself, you can top it off with the amazing Visualizing quaternions (4d numbers) with stereographic projection from Grant of 3Blue1Brown.

Aaand Boom!
You can also see it in action on WebGL here or clone the unity project from GitHub.
Thank you for reading this tutorial! If you have anything to add, questions to ask or feedback to give, please leave them as comments below.
7 - References & Additional Materials
- YouTube: ilectureonline Physics - Mechanics: Projectile Motion
- Crash Course Physics: Motion in a Straight Line
- GameDev StackExchange: How do I set angular velocity/torque so that it’s pointing to velocity/direction?
- Wikipedia: Projectile motion
- Wikipedia: Trajectory
- Wikipedia: Kinematics
- Wikipedia: Trigonometry
- Wikipedia: Quaternion
- Wikipedia: Quaternions and spatial rotation
- Unity3D Script Reference: Quaternion
- Unity3D Manual: Quaternion And Euler Rotations In Unity
- YouTube: Fantastic Quaternions by Numberphile
- YouTube: Quaternion Rotation from Sutrabla
- YouTube: Visualizing quaternions (4d numbers) with stereographic projection
Bonus
Credits and thanks to u/zakerytclarke, who created an illustration of how launch angles affect the trajectory path and posted it on /r/dataisbeautiful.
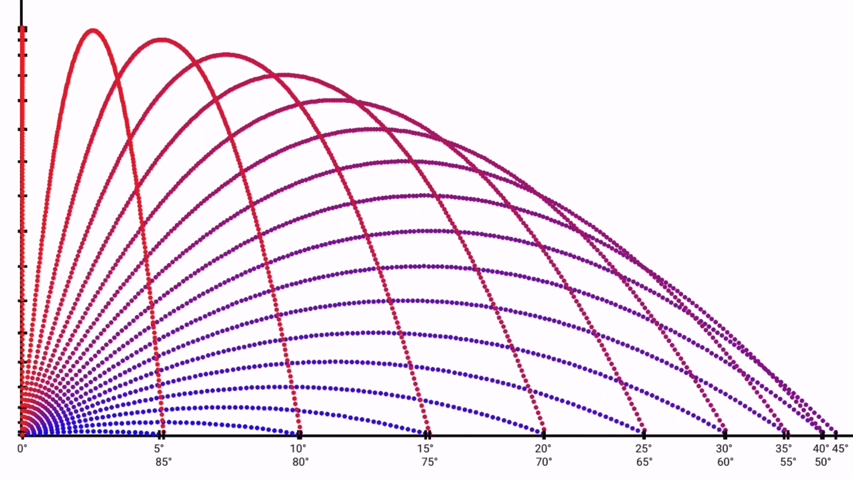
You can watch the animated version of this here.
- * : We gave it a little offset (
0.31) in the Y direction. The0.31value was not random: The platform has an elevation (0.2) in Y-direction as well, and it is scaled by0.2. We consider the half of the scale and add a0.01bias to end up with0.2 + 0.1 + 0.01 = 0.31. We added this offset to eliminate something called Z-Fighting where objects with similar depth values would appear on top of each other and cause flickering, like this. Click here to go back to tutorial text.